Monday, November 28, 2011

Smokey Waters:
Gaming ACW Ironclads


Earlier this year I played in a ACW naval game run by Kevin Smyth at the Fix Bayonets game day held at Fort Steilacoom in Steilacoom, WA. It was the first time I played ACW naval in a long time and the first time I played the Sail and Steam Navies rules from Bay Area Yards.

I got pulled into ACW naval gaming by Kevin about 18 years ago now. Back then, we had 1/1200th scale ships produced by Houston's Ships (a.k.a. Lyzard's Grin). The first ship I even painted was Houston's USS Chillicothe—an ugly little model of an ugly little ship. The rules we used were a miniatures adaptation of the old Yaquinto Ironclads board game.

Over the many years we played ACW naval, we tried a number of different rules, but none ever held us like Ironclads. The rules were detailed without being too difficult—although every game I ever ran seemed to require me to run the charts for every shot fired from every ship by every player. What Ironclads had going for it—and still has—is the nice bits of chrome that make the game interesting. Every gun was called out by type and the stats for each gun type was unique. The ACW on the water being an ersatz affair, there were a lot of different gun types. Even Union forces, which attempted some kind of standardization, had numerous ships with a hodgepodge armament. You could double-shot your guns for greater penetration (at the risk of bursting the gun).

We later expanded to 1/600th scale using Toby Barrett's excellent Thoroughbred Figures range. That range has expanded considerably—as has my collection of them. Despite selling off a number of unbuilt models to Bill Stewart, I still have several awaiting some attention from me and I've recently added more to the crowd. The new rules have filled me with some enthusiasm and I'm in an ironclad frenzy right now.

Since the Sail and Steam Navies (S&SN) game at Ft. Steilicoom, I've played two more games: one last Saturday and one today. I'm starting to get enough experience with the rules to be able to compare it to Ironclads and to the other games that came and went for us. On the whole, I like S&SN and I've invested a lot into it (more on that later).

Today's game pitted a small Union force of two ironclads and one timberclad against a Confederate fort supported by one ironclad and two wooden rams. The action took place on a nameless river. The record of it in the CSN archives has been lost and the USN decided not to record it.

The Union, consisting of the USS Essex, USS Indianola, and the USS Tyler came on to fight a Rebel battery, but were intercepted by a force comprising the CSS Arkansas, CSS General Beauregard, and CSS Governor Moore. All the Confederate ships were rams.

I rage the Union forces and Ken Kissling and Steve Puffenberger shared the Confederate command. Ken ran the Arkansas and the battery while Steve ran the two cottonclad rams.

The river was against me, which reduced my already pathetic speed. I chugged upstream with the Essex in the lead, followed by Indianola and Tyler.

Essex and Indianola chug ahead
The action started pretty soon. The Rebel battery mounted two 6.4-inch Brooke rifles and I was in range by turn 2. The results of Ken's first fire were less than desultory and that remained the hallmark of the battery's performance for the entire game.

The Johnnies came down at speed made even more rapid by the benefit of having the river flow in their favor. I soon began to worry that I would be easily outmanouvered, which is even more worrisome when facing rams.

Governor Moore and General Beauregard
As soon as the ships were in range of each other, we started trading shots. I had a definite advantage in firepower. The Essex fairly bristles with guns as does the Tyler. Indianola has fewer, but the forward battery are XI-inch Dahlgren smoothbores with a wicked punch. However, this gets into some of the interesting differences between S&SN and Ironclads.

Ironclads has a separate chart for every gun. That makes every shot unique at the cost of reduced speed of play and a great deal more fuss in play aids. Guns have a penetration factor that doubles or triples as the range gets closer. Wooden ships hit by shells that penetrate have increased damage. The result is that shooting—especially against wooden ships—can be devastating.

S&SN rates guns somewhat generically by type (rifle, smoothbore) and size (small, medium, large). If a gun shot hits the target, you compare the Gun Round (GR) value, that can be modified by range and other things, to the armor value of the target area hit. If the difference is greater for the GR value, the shooter rolls D10s equal to the difference to get damage results. (If the values are the same or if the armor value is greater, only on D10 is rolled.) Actual damage on the target occurs on 9s (armor hits) and 10s (hull hits) or on triples that can be gun hits or critical hits. 8s are suppression hits, which can accumulate causing crew morale issues. The result is that, generally, it's tough to do a lot of damage by gunfire.

Tyler struck amidships and soon to go down
My idea for the scenario was that the Rebel flotilla would be little more than an annoyance to the bombardment group. I figured that the wooden rams would be shot to pieces in a few turns. However, events transpired otherwise. The reverse side of meagre shooting results is the power of ramming attacks. Ramming is fairly effective in S&SN. It's even more effective when the rammers move quickly and the rammed don't. The Rebels' wooden rams move at a rate of 12" per movement phase. There are two movement phases in a turn, so they can cover 24" of surface every turn. That closes the distance rapidly. It's not too difficult to hit a target because the movement is I go, you go. When it;s the rammer's turn to move, the target is sitting still. (In Ironclads, ramming is more difficult because the moves a pre-plotted and done simultaneously.)

Arkansas and Essex trade shots—ineffectively—at close range
The result was that after a few disappointing shots, Steve's rams were upon me. I gave it my best, but the ineffectiveness of the shots and the effectiveness of the ramming meant that my ships were doomed. It turns out we were playing it wrong in the one sense that bow-to-bow and bow-to-stern rams are not allowed; those situations are treated as a collision instead. Playing it right might have made some difference because I may have been able to maneuver in such a way that it was difficult for ram attacks. However, the legal rams were tough enough.

The Essex was the first ship to go down. Steve rammed it earlier in the game and it limped along within one lower hull box of sinking until another ram (a stern ram) inflicted the remaining damage.

The Tyler, whose 8" Columbiads made the most effect on the Arkansas, was hit next (again in the stern). While not sunk outright, it, like the Essex, was badly hurt and succumbed later to another hit.

The Indianola kept at it. The best armored and heaviest armed of the flotilla, it got a few good shots with its big Dahlgrens, but the results were never stellar. I wiped out a few smokestacks, but never brought an enemy to a sinking or near-sinking condition. Once all three Rebel ships were concentrated on it, the Indianola was doomed.

Indianola rammed from every angle
I'm now working on ship cards and more models for Dave's Annual Naval Game. It's the most productive I've been in years. Models I've had sitting unbuilt are now in play and I'm looking forward to a lot more ACW naval gaming in the coming year.

The following is a rogues' gallery of some of my favorite ships built recently or in the past:

CSS Baltic
Tubby, but irresistible
The Baltic is a tub: poorly armed, poorly armored, and underpowered. It looks like a floating cow-barn. However, it is compelling in how it epitomizes the nature of the American Civil War on water. An ersatz ship built to protect Mobile Bay. it was eventually disarmed and its armor used to protect the CSS Nashville. I especially enjoy playing games with this king of ship. I ran it in a game earlier where it held its own for most of the game until a lucky shot by the XI-inch Dahlgren on Kevin's 90-day gunboat blew out its steam locker and left it floating with no power and a scalded crew.

CSS Charleston

Sleek and deadly
The Charleston is one of the first rate ironclads purpose-built by the Confederacy to protect its harbors. Its heavy armor and heavy rifles make it a deadly opponent to Union warships. Its bête noir is the Passaic class monitor whose XI- and XV-inch Dahlgrens can smash it up. I haven't played it in S&SN yet, but it's a tough fight in Ironclads.
CSS Virginia II

Capital ship of the Capital Navy
The Virginia II was named after the first Virginia (a.k.a. Merrimac) which made such an impression in its foray into Hampton Roads and subsequently fought what is probably the most famous ship-to-ship duel in history against USS Monitor. This Virginia was likely the most powerful ship in the Confederate navy. However, stuck on an obstruction at Trent's Reach in 1865, it had great bloody chunks torn out of its armor by the XV-inch Dahlgren's of the twin-turreted monitor USS Onondaga.

Postscript: The cost of S&SN

As I intimated earlier, even though Sail & Steam Navies is a $20.00 PDF that comes on a CD. Actually printing it out into hard-copy rules, game aids, and ship cards is expensive. I admit that I've gone deluxe on these items because I want them to last. I don't have a color printer or laminating machine, so I do it all at Kinko's for big bucks. I hope it's all worth it and that I'll get a lot of bang out of my bucks playing S&SN for the near future (until something else shiny captures my gaming attention).

So far, I have to say that S&SN is the best rules for this period since Ironclads, which remains my favorite (with a few reservations).

Sunday, July 24, 2011

Shoot 'n' Scoot


On Saturday, we played another game of John Kennedy's home-made modern version of the Kampgruppe Commander rules at the Panzer Depot in Kirkland, WA. With the first of my Bundeswehr units completed, I was eager to get them in a game too see whether they had a viable life as a wargame force or whether they would fail utterly and be cursed forever. I'll save you the suspense: they'll be fine.

The scenario was yet another wee Red juggernaut aimed at the heart of decadent bourgeois society. It was a bit bigger and badder than last game, though. Plus, there was artillery. The Soviets had the following:

T-80 Tank Regiment
1 bn – 6 x T-80
2 bn – 6 x T-80
3 bn – 6 x T-80
4 bn – 9 x BMP-1/mech inf w/1 x 120mm mortar
Recon – 1 x BDRM-2, 1 x BMP-R

T-64 Tank Regiment
1 bn – 6 x T-64BV
2 bn – 6 x T-64BV
3 bn – 6x T-64BV
4 bn – 9 x BMP-1/mech inf w/1 x 120mm mortar
Recon – 1 x BDRM-2, 1 x BMP-R

Motor Rife Regiment
1 bn – 9 x BTR-70/mech inf w/1 x 120mm mortar
2 bn – 9 x BTR-70/mech inf w/1 x 120mm mortar
3 bn – 9 x BTR-70/mech inf w/1 x 120mm mortar
4 bn – 9 x T-64BV (as 3-tank companies attached to infantry battalions)
AT unit – 2 x BRDM-2 "Konkurs" w/AT-5 Spandrel
Recon – 1 x BDRM-2, 1 x BMP-R
Assets: 3 x AT-4 Spigot

Each regiment also had a battalion of 122mm guns attached. The two tank regiments started on board with the MRR coming up later as a follow-on force.

Facing this was an initial force of American and West German units:

US combat team
1 company – 3  x M1 Abrams
2 company – 3 x M2 Bradley/mech infantry
3 company – 3 x M2 Bradley/mech infantry
4 company – 1 x M106 4.2” SP mortar
5 company – 2 x M901 ITV
Recon platoon – 1 x M3 Bradley CFV
Assets: 2 x Dragon ATGM

West German combat team
1 company – 3 x Leopard 2
2 company – 3 x Leopard 2
3 company – 4 x Marder IFV/panzergrenadiers (w/Milan ATGMs)
4 company – 1 x Panzermörser SP 120mm mortar
5 company – 2 x Jaguar-1 Racketenjagdpanzer
Recon company – 2 x Panzerspähwagen Luchs

The game was played along the length of a 5' x 12' board (6km x 14km in game scale). The NATO allies started as hidden units at the halfway point. The Soviet objective was to get two battalions of any kind across the river situated about three feet behind the NATO starting positions.

Hide and seek
The Soviet recon units started well ahead of their main formations and gently probed for the decadent, dissolute minions of the warmongering, capitalist oppressors of the proletariat. The latter, bided their time and waited to react only when it best suited them.

Following the recon, Jerry Tyer on the Soviet left lead the T-64 regiment against me. Ken Kissiling, on the right, led the T-80 regiment against Steve Puffenberger's Americans.

T-64s swarm the bucolic German countryside looking for trouble
Ken's BMPs advance along a roadway with T-80s on the flank
Ivan came on strong and vigorously scouted positions that contained numbered blinds. Ken ran his recon unit around a hedgerow and exposed Steve's M1s and M3 CFV. He followed this up by swarming in with his T-80s and soon, Steve's M1s were in full retreat.

T-80s get the better of a company of Abrams

Meanwhile, Jerry was aggressively pushing his tanks over the ford against an unseen enemy who was calling in artillery strikes to try and break things up.

T-64s fording under fire
This inaugurated our use of John's new artillery rules for the moderns. In the standard game, off-board artillery is simply a fire value (the % chance for a hit) and you throw a set number of dice, usually four, to get results. In the new rules, there are multiple steps that randomly determine fire value and intensity (the number of dice). It felt a little like rubbing your tummy and patting your head at first, but after a few turns we had it down. Although we dropped trying to use any modifiers, which can affect both fire value and intensity. We all agreed that we like these artillery rules better than in the standard WW2 game.

The high-explosive fun ended after Jerry pushed his recon unit up to my position. My ambush shot on him was ineffective and after getting shot at by too many T-64s, the Panzerspähwagens ran back to temporarily better ground.

Look! Luchs
After my Luchs (Luchsen?) scooted away. I engaged Jerry's oncoming Bolshevik hordes with a company of Leopard 2s and the raketenjagdpanzer company.

Overwatch: Leopard 2s on the hills above Hannahsheim
At the same time, my Luchsen was hiding behind another hedgerow where it could call more fire down on Jerry's tanks.

Does it ever feel like all of Mother Russia is in your face?
The engagement ecevtually got the better of two of Jerry's tank battalions. The rules give Soviet units good armor penetration and good protection, but they can't hit much that's far away. The shooting has five range bands: 6", 12", 18", 24", 30", 36". Russians can only shoot out to the 24" band and have only a 10% chance of hitting at that range. At the same range, my Leopards had a 60% chance of hitting, which allowed my to double my shots while halving my odds (six shots at 30% instead of three at 60%). The Soviet tanks in the scenario also had AT-8 Songster missiles, but the Leopard 2's Chobham-style composite armor give it the advantage in defending against ATGMs.

Even though the Russians took a beating, the modern rules allow them to keep advancing while in a shaken morale state, which normally prevents a unit from moving closer to a known enemy. We also increased the number of morale failures required before a unit has to retreat for Soviet units. In addition, I gave the Russians fairly high morale (Communist ardor?) in the scenario because I wanted to ensure that they kept coming on like zombies in some B-movie. It may have been too much, but several Soviet units did break into involuntary retreat after taking a lot of hits.

While my tanks were engaged with Jerry's tanks, he moved his BMP/mech infantry up to the woods in an attempt to get in close and assault the Leopards with his infantry. I would not have survived that fight.

BMPs on the ridge moving against the Leopards in the woods
Steve had pulled back and was holding a defensive line from the larger town, Hannahsheim (in honor of Paul Hannah who loaned us his 1/300th scale scratch-built buildings) and the fields around it.

ITVs and Bradleys hold the line at Hannahsheim
More Bradleys take cover in the fields
With his M1s forced to retreat earlier in the game, Steve only had the Bradley companies and his ITVs to hold off the inexorable swarm of T-80s. Even though he sent Ken's tanks back a few times, they just rallied and came back, fewer in numbers, but just as determined.

Hannahsheim has fallen to the Red Swarm!
At this time, the follow on motor rifle regiment appeared. This was a lot of troops and looked impressive rolling along the autobahn.

Just the lead of three more battalions rolling in
More T-64s and mech infantry (with missiles) missiles come on
Up to this point, I had been following my philosophy that on defense, it's better to be shot at and return fire than to initiate a firefight and let the opponent fire back with everything he's got. This is especially true with the way we set up ATGMs for non-antitank units. Because they aren't tank-hunters, we don't let IFVs that have ATGMs fire as an action in their own bound. Instead, they can only fire in reaction within their reaction range (16"). This emulates tactical doctrine and, from a purely game perspective, eliminates the phenomenon of flights of Spandrel missiles obliterating targets 40" away (4km in game scale, which is the max range of most ATGMs by 1985).

That being said, I got cheeky and wanted to take out some tanks. In response, I got my Jaguar units shot up and forced to retreat.

Scheiß! Mein raketenjagdpanzer is kapautt!
With Steve pulling back on my left, the Leopards in the woods were in a tough state and soon to be cut off if I didn't move them. I made one attempt in my bound, but failed to pass the check to see if my tanks could move through the woods. It wasn't until John (taking over from Jerry) shot at me that I could respond by making a voluntary retreat, which took me way back beyond the smaller town, Paulshausen, and another wood.

With my forward company of Leopards forced back and my raketenjagdpanzer (I love that word) unit shot up, I had only the company of Leopards in Paulshausen to hold the line.

Defending democracy in Paulshausen
At this point, Steve decided to fall back beyond the river to rally and recover.

My false allies in retreat
Steve's manouver betrayal left my flank wide open but it also triggered the arrival of a reinforcement team:

1 company – 3 x M60
2 company – 3 x M60
3 company – 3 x M2 Bradley/mech inf.
4 company – 1 x M106 4.2” SP mortar
5 company – 2 x M901 ITV
Assets: 1 x Dragon ATGM

M60s: Great tanks—in 1961!
This was a bit of a hollow legion. The ITVs were potent, but the venerable M60 Patton had seen its day by 1985. Its 105mm gun was the same as the one on the M1 Abrams, but the armor was old school. Not quite adequate to defend against Soviet tank rounds, the armor was useless against ATGMs.

While the NATO reinforcements were still in column, Ken threw the might of the motor rifle regiment at my one company of panzergrenadiers holding Paulshausen. I hoped that my troops would hold, given that they were in excellent cover and had lots of Milan missiles to shoot. Nevertheless, I lost half the unit and the remainder was forced to retreat. My Leopards that were also in the town, got shot up anf forced to retreat as well. This left Paulshausen wide open to the Bolshies.

Doomed panzergrenadiers defend Paulshausen
My On my next turn, I ran the only units I could into the town: the M60s. This wouldn't normally be a wise move. It wasn't this time, either. I should have pulled back and given my tanks a nice field of fire to defend the bridge. Tanks don't do well in close combat with infantry—especially infantry liberally supplied with RPG-7s. Even if I rolled well, I couldn't shoot them up enough to prevent them from coming in—and my shooting was desultory at best. The company was completely destroyed.

On my next bound, I withdrew the other M60 unit from the town and pulled back in a line facing it.

The German-American Bund (post WW2 edition)
Now the Soviets moved into Paulshausen and in the area around it.

The Bolshies enter Paulshausen
Steve, having sufficiently licked his wounds, came back across the river and took up improved positions to stop the Red Menace from getting any farther.

Last stand
I had recovered my beloved raketenjagdpanzer unit and had been exchanging shots with John's remaining T-64 battalion. I also brought up the ITVs alongside to prevent any resurgence along Jerry/John's axis of attack. I might not have worried too much, although it was a full battalion and could have done some harm had it worked around.

Noble remnant of a once-proud tank regiment
By now we called it. It was nearly 7:00 PM and we'd been playing since noon with a short lunch break around 2:30. The time seemed to fly and we have no idea how many turns we played. With the KGC time scale of one turn being 30-45 minutes, we must have been fighting in the dark for the last few turns.

Post mortem
The modern rules are really shaping up. Despite the novelty of some of the mechanics, there seems to be a better flow of the game than with the WW2 version.

The Soviet tank fire is anemic in it's ability to hit, but when it hits it can cause some damage. Even then, at one point, John started firing HE at my Leopards because he had a better chance to hit and could inflict damage on me if I rolled "10s" for my armor saves (which I have a talent for doing). Right now, the formula gives the Soviets about 50% of the hit chance for the NATO troops. This reflects loading times, ammunition, and sighting equipment. We might need to revisit that and perhaps bump it up a notch.

I gave the NATO better commanders, but just slightly better. I think I should have made the Soviets a "0" or even a "-1". Soviet tactical doctrine called for masses of tanks and troops. A Soviet tank regiment is not something that needs to be wielded skillfully. Just mass it and bring it on. They don't need a lot of command pips to that. Even a -1 commander can get one pip per turn at worst and four at best.

I made the Soviets 8 morale and the NATO 7. I think I should have made the Soviets lower. At least a 7, maybe a 6. The modern rules let them keep coming on despite being shaken. By giving them 8 morale, they were too hard to delay.

By next game, John may have a draft of the helicopter and airpower rules. I hope to have my PAH-1s ready to go. I'm currently painting Gepards, Rolands, and Stinger teams.

Tuesday, July 19, 2011

Ist das nicht ein Bundeswehr?
(Ja, das ist ein Bundeswehr)

With the inherent enthusiasm of a new game interest, I've been able to complete the first units for the modern Kampfgruppe Commander rules. In no time at all, I've become Oberst Dave of the Bundeswehr. The plan is to complete a panzer brigade that would comprise the following:
  • Two panzer battalions with three companies of Leopard 2A1 tanks (each)
  • One mixed panzer battalion with two companies of three Leopard 2A1 tanks and one company of four panzergrenadiers in Marder 1A1 IFVs
  • One panzergrenadier battalion with three companies of four panzergrenadiers in Marder 1A1 IFVs and an M106 self-propelled 120mm mortar
  • One Raketenjagdpanzer company with three Jaguar 1s mounting HOT ATGMs
  • One recon company with three Spähpanzer Luchs recon vehicles
  • One artillery battery with three M109 self-propelled guns
  • Various supporting units that are outside the brigade formation, such as PAH-1 attack helicopters and LARS batteries
Looking at that list, I'm impressed by two things: First, that a Bundeswehr panzer brigade is significantly stronger in tanks than a WW2-era panzer division; second, that in 1/285th scale it's much easier and much cheaper to build a significant force than it would be in 15mm. That's not to say that microarmor is cheap, but at an average of $2.00 per model, it's less than 20% of what 15mm would cost and considerably less than 20mm or larger.

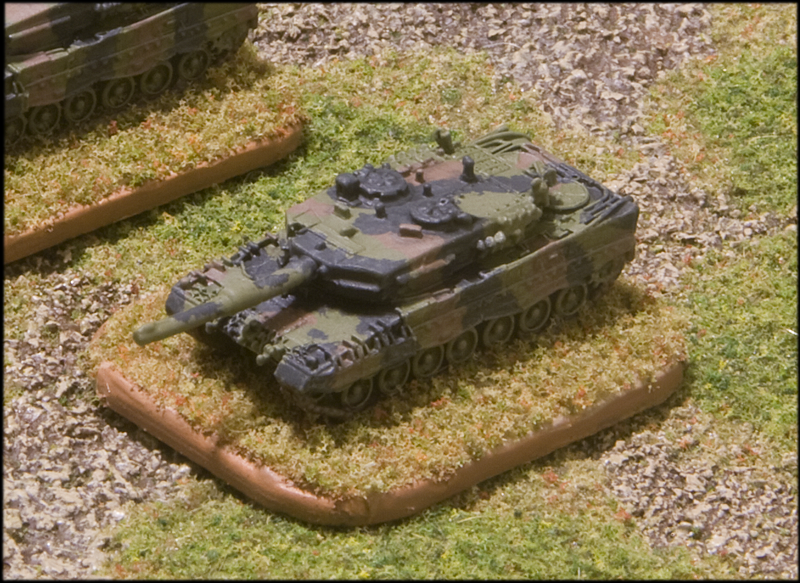
I also like how easy it is, mostly, to put together 1/285th scale tanks. My Leopard 2s come in two pieces: turret and hull. Occasionally, you get a model with more fiddly bits, like the Flakpanzer Gepard AA tank or the PAH-1 helo.

The first fruits of my project are done and ready for, I hope, a successful game this coming weekend. The units are:

A panzer battalion of nine Leopard 2A1s and a M577 command vehicle. This is a pretty simple formation of three tank companies, which could be augmented with other units ad hoc.

Leopard 2s in column on a dirt road
Leopard 2s again with the M577 command vehicle in the pea patch beyond
Leopard 2 in the rough ground
The Raketenjagdpanzer (I love how appellation that rolls of the tongue) company is three AFVs mounting HOT ATGMs. More than likely this would be attached to a panzer or panzergrenadier battalion as extra anti-tank strength.

Jaguar-1s ready to launch the HOTness
Close-up (Ja das ist ein gefährliches ding!)
The one panzergrenadier unit is either the single panzergrenadier company in a mixed panzer battalion or one of three panzergrenadier companies in the brigade's panzergrenadier battalion. I only have the Marder IFVs so far. The dismounted infantry is yet to arrive.

Panzergrenadiers in Marder 1 IFVs
Marder 1 up close
A recon unit of two Spähpanzer Luchs vehicles. Mounting only a 20mm autocannon, these are exceptionally non-formidable. However, the standard groundscale makes it possible to play scenarios where the action covers several kilometers. A good scouting force is essential for spotting the enemy and, once we get the rules for it, calling in the artillery strikes before they reach your main line of resistance.

Luchs reconnoitering the pea patch
Behind the brow of a hill looking for Ivan
I've started the remaining models of the first order to GHQ. I've made another recently, so I'll be able to get the complate complement of Leopard 2s and Marders that I need for the brigade. I'll also get some infantry figures for the troops that dismount from the Marders. I ordered some Ros and Heroics infantry a few weeks back, but there's no indication that they've shipped. I wanted the Ros and Heroics because they make figures in 1/300th that are specifically West German infantry. Of course at that scale, how can you tell? With that thought in mind, I also ordered some British modern infantry because they could pass as Germans if I paint them in the moleskin color and they heavy weapons teams include Milan ATGMs, which is what the Bundeswehr used.

Once the West Germans are done, I'll start with some East Germans. I don't really need to do Russians since John Kennedy and Ken Kissling between them have—or will soon have—and entire shock army's worth of T-80s, T-64s, BMPs, and BTRs. The East Germans, being non-Russian by definition, didn't get the big boy toys. In the mid-80s, their arsenal (even up to reunification) consisted of a lot of T-55s, with T-62s and T-72s replacing the older tanks in some units. They also had BTR-50s for their mechanized infantry. Painting East Germans will be an interesting way to get some of the older cold warriors on the board. However, I think the Leopard 2s will eat them for lunch.

Monday, July 11, 2011

The Wee Red Juggernaut


The 1980s: parachute pants, The Police, and Ronald Reagan. It was also a time known as The Cold War, which most people thought might turn into The Hot War at any moment. A great deal of speculation over how that war might be fought took place among wargamers in the 70s and 80s and game companies produced more than a few tactical games about it. SPI's Red Star/White Star was one of the first, although my favorite was SPI's MechWar '77. My friend Chet and I played numerous games pitting T-62s and T-55s against M-60s and M-48s and the fields of West Germany were criss-crossed with the wires of ATGMs that flew back and forth. But these were all board games. Despite having models available since the late 60s, I've never games the hypothetical WW3 in miniature.

While there are a number of ready-made rules sets for this period, we've started our home-grown version based on the Kampfgruppe Commander rules we use for World War 2. We also decided to go wee. Rather than the 15mm scale we use for WW2, we're using 1/285th (or 1/300th) minis from GHQ, CinC, and Heroics and Ros among others. John Kennedy is doing all the work on the rules while the rest of us kibitz and kvetch, but the project is starting to take a decent, final-ish form. John has basically taken vehicle and weapon stats from other sources and converted them to the KGC scale and game design philosophy. There are still kinks to work out and we haven't established anything yet for indirect fire, air attacks, and helicopters.

We played our first game last week using erzatz values for the vehicles because John hadn't fully worked them out. We had Chieftain tanks using M-1 stats, which got evened out the next game by using Chieftain tanks with Centurion stats. The first game was enough to get me excited about painting an army, so I'm now busy painting a few battalions of Bundeswehr circa 1985: Leopard 2s, Marder 1s, Luchs, Jaguars, PAH-1 helos, etc.

We played again yesterday at The Panzer Depot in Kirkland, WA. Ken Kissling designed a scenario representing a the vanguard of a Soviet motorized rifle division advancing on a 7km front against a battalion of British mechanized infantry and a supporting armored battalion.

The Red Menace was played by Ken and Steve Puffenberger. Their forces were two motorized rifle regiments, which consisted of three battalions of mechanized infantry and one battalion of tanks. The tanks were all T-64s. Steve's infantry was in BTR-70s with an attached company of BRDM-2s carrying a load of AT-5 Spandrel ATGMs. Ken's infantry were in BMP-2s, which mount a single launcher for a AT-5. In addition was a reserve tank battalion of T-64s.

Ken's BMP-2s advancing across plowed fields
Deployed against them were John and me. John started with the 1/Royal Highland Fusiliers mounted in FV432 IFVs with support from some Milan ATGM assets, a mortar platoon of two FV432 self-propelled 81mm mortars, and a scout platoon with two FV101 Scorpions. Farther back in reserve, I had the 3rd RTR with three companies of Chieftains, an anti-tank platoons of two FV438s mounting Swingfire ATGMs, and a scout platoon of two FV107 Scimitars.

A column of T-64s advances past an infantry battalion in BMPs
Ken and Steve came on with their units in echelon formation. Both of them led with motorized infantry and kept their tanks back. John's units were the first to be hit. They were able to hang in a few turns and repulse the first assault. However, the Bolshevik horde was too numerous and after a few turns, John's infantry was streaming back.

Steve's BTR-70s attempt a mounted assault on infantry in a town
With John's infantry hard-pressed (and John hard-pressed with customers in the store), I decided to abandon my excellent positions and move up to meet the Slavic Sledgehammer of Doom. I took up closer positions and waited until Ken's lead units got close to open fire.

Chieftains take position in the wheat field to support the retreating infantry
I had one company of Chieftains and my platoon of FV438s that opened fire on a battalion of Ken's infantry in BMPs. While I fired with good effect, the barrage of missile fire I got in return, severely messed up my units. Reduced and shaken from the return fire, I held position for a few more turns, but my fire was less effective.

Steve's regiment in supporting echelons advancing on a town
On the other side where Steve had taken the town in another assault (this time dismounted and in force), I moved a company of Chieftains and my recon platoon to support John's infantry. As happened earlier, I got a bit shot up by a mass of T-64s supported by ground-mounted ATGMs. I retreated into a wood and remained, shaken and reduced.

I also moved my third company of Chieftains into a position in a wood where they emerged at the edge to shoot Steve's T-64s. Again, the responding barrage of tank fire and missiles shot me up. Missiles, I surmised, were getting to be a problem.

Things were looking pretty hopeless and the Red Juggernaut, somewhat reduced, was poised to continue on and overrun us. But then the Royal Scots Dragoon Guards came on the board as reinforcements. One tank company went to take up an overwatch position against Steve, while the rest faced Ken. With two tank companies and an FV438 Swingfire platoon, John had enough fire power to hurt. The resulting exchange saw Ken's battalions further reduced until his total force was less than half what he'd started with. John also took casualties (#@!* missiles), but did not suffer adverse morale and, because he had a higher hit number, didn't lose any stands.

Royal Scots tank companies move into position
While John and Ken were exchanging shots overhead, I had my two units tucked into a gully in between them where I was able to resurrect my units through a few turns of rally and recovery actions.

Having forced Ken back, John took the two tank companies over to the other side of the table to face Steve's advance, which remained still potent. Ken also brought on the divisional tank battalion of more T-64s and put them in position to move to either flank. 

T-64s moving up
The situation looked promising for a British counterattack, although except for the Royal Scots, every formation was pretty shot up. I managed to recover one tank and one ATGM unit, but my other two tank companies were badly shot up and shaken. Had I advanced my recovered units out of their gully against Ken's stalled forces, I could expect a barrage of missiles from his BMP battalions that might end me.

After playing nearly five hours—interrupted by rules discussions and pesky store customers—we called the game. The Brits held the line against the Bolshies. Despite much concern, I ultimately lost only three stands while the Soviet regiments had been significantly reduced. Even then, they outnumbered the Brits. However, it would have been difficult for either side to make progress against the other. 

The rules seem to work very well. KGC has it charms, which is why we like the system—despite it anomalies. The modern stats transfer over well and easily integrate with the KGC command/control mechanisms. In the next games, we'll introduce helicopters and indirect fire, which should add an interesting new dimension to the games.

Sunday, May 8, 2011

Odd and ends...

It's been a while since I posted anything, even though I have had a few things going on worth blogging about. Today's blog is a grab-bag of recent goings on. Unfortunately, I didn't bring my camera to the games I mention, otherwise I would include some nice pictures to ameliorate my vapid, tortured prose.

Employment
I've been fully employed again—and then some—for a while now. It was a slow start, then I started working two jobs (six days a week), and after today, I'm back to one, but the money is better than ever.

I like the latest gig. I get to play with words and I'm mostly able to do it on my own schedule with my own project plan. It's temporary (like Achilles), but looks to last through summer and maybe into the fall. What's after that, I don't know, but "Sufficient unto the day is the evil thereof" (Matt. 6:34), so why worry now.

Hail Caesar!
I picked up the latest expensive, hardback, full-color rules from Warlord Games today. I enjoy Black Powder immensely, so Hail Caesar! looks to be more of the same fun--except that it's ancients now. I have so many ancients rules that I want to play (and don't), one more can't hurt.

However, I see the dreaded activity of debasing and rebasing in my future. It also means the end of my dreams for a revival of pre-DBx WRG ancients. Of course that was always a bit of a pipe dream. Kevin Smyth and I had a brief retro-gaming period playing WRG 6th, but everyone else turned up their noses at it. Alas.

I very much like Field of Glory, too, but no one plays it much. Besides, I already have 15mm armies for FoG. I'm looking for something to use for my 28mm figures.

I'm contemplating all the ancients figures I have—mostly unpainted—and it's really a hodge-podge. I have a lot of 3rd c. Romans that will require rebasing, as well as several more unpainted. Even with all that lead, I'll need to buy more to flesh out my cavalry units. And then I need an historical enemy to fight. I've also got a lot of Sassanid Persians and some Carthaginians, but these are almost exclusively bare metal.

Black Powder
Quite unintentionally, I got roped into not one, but two Black Powder games yesterday. I had planned to spend the morning/early afternoon having dim sum and shooting with Phil and Karen Bardsley and then back home to putter and hang with the cats. However, I stopped off at The Panzer Depot on my way home and Bob "the tempter" Mackler cajoled me into being an Austrian cavalry commander: Graf von Sullivan.

Game 1 went beyond my expectations. It was already under way, with Bob on the ropes. I was the cavalry reserve. After a few turns of rolling 10s for my commands (and doing nothing), I got lucky several times in a row. I sent in the Austrian cuirassiers and swept all before me: taking out some light cavalry, two batteries—and even beating back the vaunted Grenadiers au Cheval. This didn't make for an Austrian victory, however. Our center had ceased to exist. We had two units huddled in square formation on one flank while the French infantry occupied the rest of the board.

After game 1, I was nearly out the door. If I hadn't dallied to talk with John and Dave Redding, I would have made it home safely. Instead, Bob buttered me up with compliments about my superior Austrian cavalry-handling skills and worked on my vanity to lure me into a second game.

Game 2 was played on a bigger table with more figures. John Kennedy, Dave Redding, and I were the Austrians. Bob Mackler and Dick Larsen, the French.

Regardless of how many big Austrian units there were, the French seemed to outnumber us. Also, Dick had his all-grenadier division in play (he based this puissant formation on Oudinot's converged grenadiers ca. 1806).

I had two Austrian line battalions, two Austrian grenadier battalions, two batteries, and some jaegers. Facing me was Dick's grenadiers du mort. as well as Bob's grand battery. To my right was Dave with the Austrian cavalry, the same guys who had rode to glory in game 1. To my left was John with a division of Austrian infantry, a battery, and a hussar unit, and then farther left, John had a division of light cavalry with some grenzers and jaegers.

The course of the battle saw our flanks crushed while our center fought bravely but in vain. Dave's first attacks against Dick's cavalry wind seemed to go OK. His cuirassier forced two of dick's light cavalry units to retire off board and his lancers took out one of Dick's batteries, much to Dick's chagrin. However, a counterattack by Dick's "Gros Bottes" put the hurt on him. In short order, he lost his lancers, his light cavalry and rolled snake-eyes on the morale test for his supporting cuirassier unit. The remaining cuirassier unit was forced to retire because the division was broken.

In the center, I put one of my big battalions into line thinking that I would shoot up Dick's grenadier columns. They were on me in a flash and a vicious, prolonged fight ensued between two battalions of French grenadiers in column and my battalion in line. I got some advantage from being a big unit, namely more dice in combat and a stamina of 4. However, Dick was throwing 14 dice against my 9. My dice seemed unable to roll above 3; his dice were unable to roll below 5.

Nevertheless, after several turns of fighting, aided by the fact that all units were "steady" and automatically passed their first morale check, I managed to have both of Dick's columns shaken, while I was still hanging on. But even shaken, Dick managed to roll better and my unit was eventually forced to retire shaken to the other side of the hill.

On my left, Bob started early with an attack in line that ran all the way up to within close range of one of my batteries. I think he meant to shoot it up, but failed. The return fire from the battery, two of my columns, and John's jaegers caused Bob to go disordered and shaken.

I figured this was the time to send in a column of my own grenadiers. They performed magnificently, but Bob's unit was "steady" and so it automatically passed it's first morale check. It took another two rounds before I managed to rout him. At that point, I was exposed on a hill before Bob's merciless grand battery. At one point, I became shaken, failed morale, and was forced to retire out of cannon shot--exactly what I wanted to do. But then next turn, when I attempted to rally the unit, I rolled boxcars (blunder) and got an advance order, which took me back into the cannon fire, now augmented by Dick's howitzers. One turn of getting smacked by three batteries and the unit routed away.

John's cavalry wing fared about as well as Dave's—although John was facing Imperial Guard cavalry. The first few turns were a fight, and then everything went south. That division had left only a battalion of grenzers in square and some jaegers skulking in a hedgerow. Fortunately, Bob was unable to get his cavalry to do anything else after beating John. John's infantry in the center was completely unable to go forward against Bob's battery and infantry opposite him. John's guns kept up a lively fire at one of Bob's remaining battalions, but another battalion was free to work it's way down to take out John's grenzers who were fairly impregnable in their square against Bob's cavalry.

Dave Redding left, bequeathing me his single withdrawing cuirassier unit, i.e., the entire Austrian cavalry wing. I had been working away with some jaegers at one of Dick's grenadier battalions that had formed square back when Dave had a functioning cavalry wing. It wasn't much, but I kept him disordered and taking casualties so that he couldn't reform from square. I turned my howitzer battery on him now and in a few turns managed to smash him and rout him from the field. This left my small jaeger unit exposed to Dick's cavalry.

Dick charges one of his hussar units at the jaegers, who formed up and did the best they could. Their best wound up being pretty good. After a single round of combat, the hussars lost and routed.

It wasn't enough. After my line battalion retired from fighting Dick's grenadiers, I threw in my second grenadier battalion, in column, against one of Dick's shaken columns. The result was rather disappointing. I got chewed up, but stayed in anyway. I now had just one fresh unit, one unit routed, one shaken, and a third beat-up and locked in a losing combat. That was it for the Austrians.

I think I've learned that unless you must, there's no good reason to fight in line when your opponent is in a position to get you 2:1 with units in column.

Viva Mexico!
We played some Mexican War games using Fire & Fury Regimental. Chris Craft has been working on 15mm Mexican War figures for a while now. We played Resaca de la Palma a month or so ago and just a few weeks ago we played Palo Alto. The games went better for the Mexicans than one might think. Even though they are qualitatively outclassed, the Mexicans can put up a good fight.

In the Resaca de la Palma game, the US won handily, even though it was close at the very end. Palo Alto, however, was a real challenge for the Americans.

The Mexican players we me and Ken Kissling, while Chris and Steve Puffenberger were los Gringos. Ken had a lot of cavalry, but it was mostly middling to poor in quality. However, he managed to break a square of American regulars and push back the elite (but few) American dragoons.

Mexican shooting was better than expected. My guns even managed to shoot up Ringgold's flying battery, which Chris used as a position battery instead of flying it around. My Zapadores fought to the last stand, which held up the American left. My one cavalry unit played a part, too. Feckless though it was, I managed to work it onto the American flank where it caused Chris enough concern to dispatch an infantry regiment to deal with it. That was one less infantry regiment attacking the Mexican line.

At one point, when I foolishly thought los Gringos were on the ropes and my time to counterattack had come, I unwisely advanced the Tampico battalion, one of the best units in the Mexican army, against one of Chris' batteries. I got shot to bits. 'Nuff said.

The game eventually ended as a Mexican win, but just barely. Both sides took heavy casualties and most of the Mexican infantry was worn or shaken. However, the Americans had two infantry regiments rout off the board, one dragoon regiment destroyed, and Ringgold's battery nearly destroyed (one damaged section remaining).

So far, I've enjoyed the Fire & Fury Regimental games I've played. Kevin Smyth is play-testing a scenario for Hobkirk's Hill on Saturday in Tacoma, which I plan to play in.

Cats
Finally, the cats. Grendel seems to have developed Feline Hyperesthesia Sysndrome (FHS). It sounds more terrible than it is. The name is fancy veterinarianese for "we're not really sure what this is and what causes it." I noticed it first when Grendel started chasing his tail. Odd as he is, he's never done that before. That was back in November. From there, he started twitching his back and then running to escape from himself. It's a bit concerning to see. It's not something he does all the time, just in brief episodes.

I took him to the vet when the signs first showed up, but the vet said it's OCD. That's pretty much the line on FHS. It's an emotional disorder that may be due to diet, environment, or a lack of stimulation. I.e., it could be anything. And, it may go away if the cause is eliminated—if you can discover what that is.

I've been treating him with Bach's Rescue Remedy, which is supposed to calm the nerves. I put a few drops in his food at every meal. It seems to do some good. I also use the Zoom Groom on his back when he starts having one of his episodes. Whatever the vet says and what other information states, it still seems to me like his skin is driving him crazy at these times. The Zoom Groom scratches him where he itches. However, there doesn't appear to be anything wrong with his skin. His coat is full and healthy and there are no places where he has been biting himself. I'm just hoping it will go away, but I know I have to keep doing things that will stimulate him. He's almost 8 now and has been with me for five years. He's indoor only, so being cooped up all this time may be a factor. But I don't live where I want to let him out, besides, I have a townhome whose only door to the outside is on the first floor. I couldn't hear him coming and going if I did. He'd sit outside and whimper all night because I couldn't hear him to let him in. So I Zoom Groom and give him Rescue Remedy. It's better than the Prozac the vet recommended.

In other news, whereas I first thought that my cats were antiliterary, I'm now adjusting that view. I think cats may read by osmosis, which is activated when they rub their face against a book. This might explain why they do it so often. I can't get five minutes into a book before one of the cats has his or her face in it. I now think that their attempt to keep me from reading is just a ploy to ensure that they gain knowledge without my gaining it too. Plotting, always plotting. Little scamps.