Showing posts with label DANG. Show all posts

Friday, December 29, 2017

D.A.N.G. XVI (Struck at Sea)


Dave Schuler hosted the 16th running of Dave's Annual Naval Game on Thursday. Most of the usual suspects showed up and we had nine players.

The game for D.A.N.G. XVI was Seastrike, a 70s era "ultra modern" naval warfare game. The mechanics are much, much simpler than a game like Harpoon and we had a fast and furious game.

We divided into sides: Big Red and Great Blue. Red was Arthur Brooking, Dale Mikel, Scott Murphy, and Mark Waddington. Blue was Kevin Smyth, David Demick, Charlie Berlemann, George Kettler, and me.

Our forces were equal. Dave painted two fleets using 1/1800 scale ships from Shapeways. We spend a bit of time right off sorting out our squadrons and determining our missions. There was a potential of playing three scenarios. However, we wound up with just one battle royale.

Each side wound up dicing randomly to (1) clear the enemy from the central sector and (2) protect our home base. We put all of our major surface units into two squadrons, with our submarines and missile boats guarding the home base. Red pretty much split their forces into two even groups of two surface squadrons and one squadron of two subs. One group was in each of their home base sector and one went into the central sector to sweep us out.

At first, it looked like they were outnumbered and outgunned. Charlie had a squadron built around our one cruiser, while our second squadron was frigates of varying size and armament. We kinda felt the way the Spanish Armada did that summer day in 1588 when they appeared off Plymouth. Our orders were aggressive: seek the enemy, engage him, destroy him—in theory, at least.

Having never played Seastrike before, I wasn't sure what to expect. Combat is driven by a card deck and things get bloody very quickly.
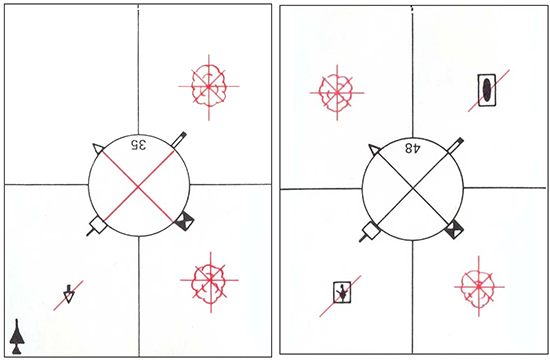
Instruments of misfortune

The cards determine whether weapons systems work (for example, if SSM missiles lock onto a target ship) and what damage is done. Each card is divided into four quadrants with a central circle. Each quadrant contains damage for a specific type of weapon: guns, SSM, torpedoes, and ASW.  It's a bit more deterministic than dice rolling and as the deck decreases, the odds of what will come up keep changing.

We both deployed 1 foot onto the table, which gave about 6 feet separating us. Ranges go up to 16" for SSMs, so we had a bit of sailing to do before contact, although there wasn't much maneuvering. Shooting SSMs at each other is a far cry from gun captains aiming shots over iron sights or directing salvoes from high atop fire control towers.

Charlie's squadron sailing to death or glory

Neither side had much luck with its airstrikes.  Red crashed or aborted all of their take-offs on turn 1. We got four in the air, but lost two to CAP (the ones with Exocets), had another shot down by PD, and the fourth got through the defenses only to miss with its bomb.

Red managed to get a couple in the air on a subsequent turn, but this time our CAP took them down.

The surprise killer weapon of the game was submarines. We left ours guarding home base, but Red took two (and two decoys) into the central sector with them. They were able to deploy these well ahead of their squadrons. They were opposite where Charlie's squadron was advancing. We put up ASW helos to detect them, but they took the "quiet sub" option for them, so we failed to know they were there until we saw fish in the water.

Normally, resolving torpedo fire in a naval game is a complex affair involving calculations that take into account the distance between ships, the sea conditions, angle of deflection, speed of the target and firing ships, aspect, depth of hull for the target, time of day, curvature of the earth, time elapsed since the last grog ration, etc.

Okay, the first torpedo in the spread has missed. Let's calculate for the second...

Not in Seastrike. Mark, commanding the subs, managed to get off four torpedoes with his first salvoes and sunk (i.e., blowed up) two of Charlie's ships. A salvo of four torps intended for the cruiser was momentarily delayed by drawing a system failure card. But only for a turn.

Next turn, the other sub fired its torpedoes along with the first sub getting off its delayed salvo. By the end of turn three, Charlie's squadron was a wreck of burning debris on the water.

The sorrow and the pity

This now left our righthand squadron. Not shirking from duty and unafraid to put our ships in danger, we went ahead full speed at Red's lefthand squadron. I think I figured that (a) we'd only lose by turning about and cutting our losses and (b) We had more and bigger ships in our righthand squadron that Red had in their left. So, obviously we forge ahead. Of course, Red still had their untouched righthand squadron, but we thought it would take a few turns for them to get into the action and by then we might have wiped out the other squadron.

That's what we thought.

We did put a lot of hurt on Red's lefthand squadron, but they gave back nearly as good as they took. That squadron failed morale and had to withdraw, but at the same time so did we. I rolled a "10", which I've always had a talent to do in games where "10" is a very bad thing.

Carnage on the high seas

So ended the game. Neither side had sent ship's to attack the other's home base, so there wasn't another scenario to play.

As in most D.A.N.G. games, both sides play the mini campaign to get all of their forces against all of the enemy's forces. It winds up often being a big battle. It would have been interesting to see what would happen if, as Dave mused afterwards, we'd have been required to put squadron's in all three sectors. We would have played out three smaller battles and learned from all the mistakes we made playing out the first.

And there were mistakes—mostly made by Blue. If we knew what super-killers subs were, we'd have brought a couple, too. I think our squadrons were too big. We put everything into two big buckets and the ships just got in each other's way. We were each given four squadron commanders with quality/morale ratings of 8, 7, 7, and 6. We could make generic squadrons which would be quality/morale 6, but we pretty much opted to benefit from the higher rated commanders. More squadrons would have been more flexible and also would have given each player more to do. With five people in Blue and four in Red, we had nine players and five squadrons in play.

Seastrike was fun to play and we'll definitely need to get a non-D.A.N.G. game in some time in the coming year. It's a vintage game that's very hard to find now and very expensive if you do. Boardgame Geek has an interesting nostalgic review of it from 2007.

Thanks agains to Dave and Lynn for hosting. D.A.N.G. is always one of the significant events of the Christmas season.

Wednesday, December 28, 2016

Sturm und D.(r)A.N.G.


We met at Dave Schueler's house in West Seattle on Boxing Day for Dave's Annual Naval Game (D.A.N.G.) XV. A few of our stalwarts were absent, but we had a good number on hand, including a cameo performance by Paul Hannah, esq. The game this year was a hypothetical crisis in the Caribbean ca. 1903 where Der Huns are trying to bully a port away from Venezuela on the pretext of unpaid debts. Teddy Roosevelt sends in a few naval units to brandish the Big Stick and warn off the sausage-eaters. What could go wrong?

Dave Creager, Arthur Brooking, and I were the Americans. Dale Mickel, Scott Murphy, and Chuck/Charlie X, were the Germans. At the beginning of the mini-campaign, the Germans had already bombarded some Venezuelan ports and had naval units in Puerto Cabello. The Americans were all up at Culebra in the Virgin Islands. The Germans also had naval units in Port of Spain. The victory conditions were simple and exclusive: The Germans had to gain their coveted port in Venezuela and the Americans had to make sure they didn't.

In the end, the Germans' Drang nach einem Hafen turned into a Sturm auf Zee.

Each side had options they could take. For the Americans, our at-start units were a collection of protected cruisers and gunboats. The Germans had some roughly equivalent ships but also three armored cruisers that outclassed anything we had. Since we had the option to take three battleships (Indiana, Massachusetts, and Texas), we did. What's a naval game without 13" guns? The Germans also had the option to add two battleships to their force, but they would be coming from far off and wouldn't be available until day 6 of the mini-campaign. Being impatient Teutonic types, they decided to go with what they had and forego waiting for the big boys. That was perhaps a mistake.

By day 2 of the mini-campaign, we had one squadron at Puerto Cabello only to find that the few German ships that were there at the start had been reinforced with the rest of the German ships from Port of Spain. Our other squadron, containing the battleships, had made for Puerto de la Guaira to act as a blocking force against the Germans coming from Port of Spain, which, however, had already passed through before we got there.

With our squadron at Puerto Cabello outnumbered and outgunned, we stalled for time and sent a dispatch boat to Puerto de la Guaira to bring up the other squadron. Meanwhile, both the Americans and Germans were pressuring the Italian squadron in the Caribbean. The Germans wanted them to join their blockade of the Venezuelan ports and the Americans wanted them to stay out of it. In the end, the Italians let the Germans lead them by the nose into trouble not of their making.

By day 3, the American squadron was assembled. The Germans had one cruiser and a gunboat in the harbor landing troops. We negotiated to have the USS Atlanta (our slowest ship) go into the port and land some Marines to protect American interests. We later attempted to reinforce Atlanta with a gunboat (USS Concord), but that was turned back when the Germans sent another gunboat to block the channel.

At this point the Italians steamed into troubled waters. Our ultimatum to them was to turn about, which they did at first. Then a German cruiser came to escort them back. We fired a shot across their bows, which set the stage for the ensuing naval action of Puerto Cabello.

We used David Manley's rules Fire When Ready! to play the game. They're a nice, quick-moving set of rules for the pre-dreadnought era. Dave's ship models were all Panzershiffe 1:2400 scale.

Each side organized their forces into three squadrons:

American 1st squadron - 3 battleships, 4 protected cruisers
American 2nd squadron - 4 protected cruisers
American 3rd squadron - 3 gunboats

German 1st squadron - 3 armored cruisers
German 2nd squadron - 3 light cruisers
German 3rd squadron - 1 German light cruiser, 2 Italian light cruisers

Out of the main fight were the Atlanta and the German cruiser and two German gunboats who were baring their teeth at each other in the harbor.

The initiative system in Fire When Ready! has each squadron rolling a D6 and adding its squadron command rating to get a number that could run from 1 (worst) to 8 (best). On turn 1, we had universally poor initiative rolls, but that helped. The sequence of play has the best initiative squadron move last and fire first. Loath to fire the first shots, the Germans, who all had priority to fire before the Americans, passed on shooting. We, having already fired a shot across the Italians' bows, felt obliged to open fire on just the Italians when our turn to fire came. The results weren't spectacular. Only the 1st squadron (Arthur and me) had the range and the concentration of fire increasingly obscured subsequent salvoes. But this meant that things would start to happen.

Turn 2 was equally fortunate for us because we got the higher initiative for our squadrons. The German 2nd and 3rd squadrons aggressively moved in to close the range and get their torpedoes in action. We got to shoot first and walloped them. The USS Indiana blew up the lead ship (Gazelle) in the German 2nd squadron (Dale's) and badly mauled the second ship (Niobe) so that it was a burning wreck. 13" guns will do that to cruisers.

Arthur (running the 1st squadron's cruisers) kept up fire on the German 3rd squadron and continued to hurt the Italians. Dave Creager was engaging Chuck's armored cruisers at a disadvantage, though they seemed to be matching hit for hit--except Dave couold take fewer hits before disaster.

On turn 3, I split the battleships off from the 1st squadron and left Arthur to keep at the now badly hurt 3rd and 2nd German squadrons. I figured the battleships needed to get into action against the armored cruisers. Still in range of the other Germans, the battleships lent a hand as Arthur dispatched the Italians and put more hurt on Scott's remaining German cruiser. Dave Creager got a lucky hit against one of Chuck's armored cruisers (Fürst Bismarck), which left it in bad shape.

By turn 4, the Germans were buring or sinking all over the water. Chuck's other two armored cruisers were in good shape, but the American battleships were already in range and shooting, so there was no need to stay around. The Fürst Bismarck was only making three knots and wound up striking her colors. Dale's surviving cruiser and Chuck's two armored cruisers fled away.

In the harbor, the Germans made a failed torpedo attack on the Atlanta and shots were exchanged, but with the general carnage of the German ships outside the harbor, further German hostility was futile. The German forces in the port laid down arms and prepared to be escorted out.

Without the battleships, the Americans would have been doomed. Had the battleships and armored cruisers engaged right off, the battle might have been less lop-sided, but they were on opposite ends of the table. However, despite being damaged a bit, Dave's protected cruisers fought the armored cruisers to a standstill until the battleships arrived. Only Olympia was much damaged, but not critically (yet).

We speculated after the game that this naval disaster for the Germans might have lead to Germany abandoning its aggressive naval program, which might have averted World War 1 and thereby World War 2, Korea, the Cold War, Vietnam...

For another account of D.A.N.G. XV (and piccies) see Dave Schueler's blog Naval Gazing.

Saturday, January 11, 2014

Naughty and nice (or My Christmas vacation)


I had two weeks off over the Christmas-New Year's holidays this year. Going into it, I giddily imagined all kinds of productive activity. The aftermath is a more sober reflection on the best intentions going awry. Nothing bad happened, but much of what I intended came to nought. It was, however, a welcome time off. I think that staycations are the most relaxing time a person can have away from work. I can't say that I came back to work on Monday eagerly, but I did feel content that I had been away long enough to feel prepared for going into the lion's den of work backlog and email pile-up.

What follows is my list of the naughty and nice I did on my Christmas staycation.

Nice
On the nice list:

Resumption of painting - I'm back upstairs in the wee painting nook tucked into the closet in my den. I forgot how much nicer it is to paint on my painting table.


It was a serendipitous find at Fred Meyer about a dozen years ago. It's supposed to be a kitchen utility table and has a stainless steel top. It fits perfectly in the closet, so I can close it up and have it all out of site when I'm not painting. (However, the general clutter of my den makes closing the closet doors impossible. See the naughty list below.) When I sit at the table, the surface is about the level of my sternum, which makes it very comfortable to paint. I can support myself on the table to get better brush control without having to lean in too far. The past year of painting on the dining table was tiring. I couldn't do it for long before neck and back strain drove me to the couch to be buried under cats and thus immobilized for further painting efforts.

The lighting is also much, much better. I can actually see what I'm painting.

With a bit of music playing in the background, I've been able to sit and paint for extended periods without tiring. It nicely addresses my cat problems, too. When I painted on the dining table, Rhiannon would come up on the chair next to me and start head-butting my brush arm. (Look close at some of my figures and you'll see some wild brush strokes...) Maebh regarded the dining table as her personal playground and my work was often interrupted by a fluffy little Manx jumping up and landing in the midst of my work with her characteristic "brrrrt!" which I interpret as "Brace yourself, biped! Maebh the Merciless is here!" When I paint upstairs, the munchkins just lounge about on the settee. Perhaps the music lulls them.

D.A.N.G - Dave Schueler hosted another Dave's Annual Naval Game. This event is a highlight of the holidays and I may have missed it once in the dozen or so years Dave and his wife have been hosting it.This year's mini-campaign was Operation Landcrab, the US campaign to re-take the Aleutians in May 1943.


I was on the Japanese side. We had one glorious small action that looked to be a total loss for Dai Nippon. We lost a heavy cruiser and light cruiser from American gunfire, but the US players got too eager and pursued us right into several spreads of 24" torpedoes and two of their three heavy cruisers went down hard. The Long Lance struck! (Actually, they were type 90 torpedoes, but that's close enough to the type 93.)

The second action was much bigger and looked to be less favorable to the Japanese forces. The battlewagons came out, but the superannuated Japanese dreadnoughts were getting shellacked by the less superannuated American dreadnoughts. The socializing, campaign dallying, etc. took its toll on our time and we were unable to finish the last battle. We had a lot of long lances in the water (actual type 93s this time), but the American tactic was to keep away and rely on radar-guided gunfire to shoot us to bits. Dave rolled an ersatz resolution on our torpedo attacks that decided a bit of damage on the American BBs. However, we also figured on the Japanese losing or having badly damaged the BBs we had in action.

In the end, we figured that the Japanese gave the US a bit more trouble than they did historically, but that driving the Japanese off of Attu and Kiska was a foregone conclusion in any case.

Battlegroup Overlord - I had a chance to play in a Battlegroup Overlord game run by Chris Craft. BGO is Chris' latest WW2 skirmish crush. He pitted his American paratroopers against the Hun in a game featuring a lot of very close terrain.


Hedgerows abounded and it was pretty difficult to get fields of fire. Despite it being a very bad day for American tanks, the Germans lost. I was a Hun commanding a platoon of landsers. We took out a tank and shot up a squad of paras, but we took a lot of fire in return. I think I had a bit more than a large squad by game's end.

I couldn't help comparing it to Bolt Action, which is what I play a lot of. In the end, it was a toss-up for me. Each has its own way of accounting for the randomness of command and control. The effect of shooting is pretty much the same. However, BGO's rules about pinning create more command friction for unpinning. Also, the battle rating system in BGO makes for a more logical end point for a game. Essentially, each unit has a battle rating, the aggregate of these ratings is the battegroup's battle rating (BR). As events occur, like losing a unit or attempting to unpinning a unit, one side has to blindly pull a battle counter numbered 1 to 5 and set it aside. As soon as the the number of pulled battle counters equals or exceeds your battle rating, you lose—regardless of other circumstances on the game table. For example, we shot up the American armor and had two Tiger Is and two StuG IIIs remaining (having lost only one StugG III), yet lost because our infantry was shot up.

I have the earlier set of rules in the series, Battlegroup Kursk, which I intend to use with my vast number of Eastern Front minis in 15mm.

Monolith Designs/Graven Images 40mm Prehistoric Europe - I broke down and finally ordered figures from this range after salivating over them for a few years.


The term "prehistoric" has to be understood in context. These aren't cave-men. They're actually modeled after the European Late Bronze Age (ca. 1300-700 BC). When I was in Copenhagen in 2000, I had a chance to spend several hours in the National Museum and look at artifacts from this era, including some Bronze Age helmets and weapons.

The range was designed and sculpted by the late Jim Bowen, who passed away unexpectedly earlier in 2013. Steve Mussared, who runs Monolith Designs, produces the range and still has more of Jim's masters to put into production this year, so I expect to be be buying more soon. They're not cheap. A pack of four figures runs 10.99 GBP, but they're BIG.

At this point, I'm still waiting for them to arrive. They shipped from Monolith in the UK on Dec 20 and are caught in the devil's trifecta of the Royal Mail, the US Postal Service, and the Polar Vortex of Doom, which shut down airports and embarrassed Al Gore (just kidding, nothing embarrasses Algore). I am hoping each day now to see a little something in the mail...

I'll use them for skirmish gaming (of which more anon). I've recently discovered the Song of Blades and Heroes rules from Ganesha Games in Italy, which look like the front-runner for rules of choice.

Naughty
So much for niceness. The naughty is as follows:

The garage from hell - It haunts me. It taunts me. It calls me names and questions my legitimacy. Still, I can't bring myself to clean it. With two whole weeks off (apart from family commitments and game days), I resolved to spend a little time each day cleaning the garage and before long, voilà, a clean garage where I can once again park my nice car rather than leave it outside to suffer from the elements. Alas. It didn't happen. As I write this from the den in my townhouse, two floors above the garage, I can hear it titter and scoff. I will have the last laugh, though. Maybe this year...

Reading - I always expect to read more than I do. I have a number of books that I've partially read. I tend to read sporadically from this book and that as the mood strikes. It's probably hell for retention, but I always seem to have more that I want to read than I have time for.

I got very little read, but did manage to get through Bronze Age Warfare by Richard Osgood et al. This book was a chance find at Half Price Books a while back. Now that I'm getting psyched for the 40mm prehistorical europeanoids project, the book is a welcome resource, even though much of the evidence available comes from the Aegean, which saw a higher level of civilization that Northern Europe. Thank goodness for the bogs, which have given up several treasures (and near-intact corpses) from this period in European prehistory.

Still being slowly ploughed through are several books on the Wars of the Roses and Alexander Rose's fascinating Kings in the North about the Percy family in British history.


Eating - OK. I was a pig. With time on my hands, I cooked. Having cooked, I ate. I was also cruelly tempted by a host of Christmas goodies. Surprisingly, I gained less weight than I feared, but at 219 lbs., I am a few pounds above my best weight of last year.

Painting - Although I got back to painting in my den, it took me until after New Year's to do it. I can rationalize that until then I was busy with holiday activities, blah, blah, blah. Really, though, I was too busy eating and lazing (i.e., not painting, not reading, not cleaning the garage). As I posted earlier, I have resolved to do better this year—and so far have done.

No Tannenbaum, no Tannenbaum - I haven't put up a Christmas tree for a few years now. It's not from lack of desire. I used to get a tree delivered each year from the nursery down the street, but they went out of business and I haven't had a tree since. It's pretty much impossible to schlep a tree with my 350z. That leaves me with the option of borrowing a car or finding somewhere else that delivers, which I haven't.


Maybe next year when I can claim more nice than naughty.

Friday, December 30, 2011

DANG X: Up the Carnot river without a paddle wheel

Tuesday we played the tenth Dave's Annual Naval Game (D.A.N.G.) hosted by Dave Schueler. This year's theme was the American Civil War. Dave provided a simple campaign system that had a Union flotilla hunting for an ironclad that is rumored to be nearing completion somewhere up the (fictional) Carnot river in (non-fictional) Mississippi. Several others of us provided 1/600th scale ships (since we've been playing ACW naval since the early 90s).

We divided into sides and each had a set number of points available to buy ships. The campaign was set circa 1863 (before the fall of Vicksburg) and the available ships weren't necessarily limited to ships that operated on the inland waters at that time. The selection was large, so limiting ourselves to just a few was a tough choice. The only constraint was that the Confederates had to chose at least one ironclad.

The Union players were:
Me (USS Essex)
Kevin Smyth (USS Monarch)
Dale Mickel (USS Tyler)
Scott Murphy (USS Tuscumbia)
George Kettler (USS Naumkeag, USS Rattler)

The Secessionists were:
Arthur Brooking (torpedo boats, flotilla commander)
Dave Creager (CSS General Beauregard, CSS General Bragg)
Mark Waddington (CSS Missouri)

In addition to the ships we paid points for, the Union had two transports with troops that could be landed and some barges that contained fuel and ammunition. The Confederates had a series of batteries at points along the river. We could run by these batteries (at a loss of victory points) or attempt to silence or take them (earning victory points).

Like a chump, I didn't bring my camera. As luck would have it, others did. Dave Schueler's blog has his recount of the game with lots and lots of photos.

Day 1: Action at Sullivan's Ferry

On the first day of the campaign, the intrepid Union flotilla went into action against a battery at Sullivan's Ferry, just above the confluence of the Carnot and the Mississippi rivers. Only slight damage was incurred in capturing the batteries, which was quickly repaired at night.

While anchored at night, a marauding force of Rebel cavalry—clearly lead by someone much less illustrious than Nathan Bedford Forrest—was surprised by the troops accompanying the flotilla. Prisoners quickly and effusively gabbed and provided us with the location of all the remaining Rebel batteries on the river.

Confederate progress on completing their ironclad was a bit delayed due to faulty workmanship and lack of a suitable work ethic—defects quite foreign to Yankees and their can-do spirit.

Day 2: Burning out secession one town at a time

At dawn on the second day of the campaign, Honest Abe's able seamen proceeded upriver to Hannahsville, a secessionist hamlet nestled on the river's brim. En route, another battery was subdued, again with little damage to the squadron.

Upon reaching Hannahsville, the tars made a merry bonfire of the nest of rebellion. The town burned spectacularly, with the exception of the few buildings deemed necessary to the war effort, such as Madame Crotchfyre's social club and the "Last Gulp" saloon, which entertained the flotilla's officers while the tars aboard ship tucked into a nourishing meal of rancid hardtack and brackish water.

However, while teaching this practical lesson in civics to Hannahsville, the Union ships were set upon at night by a squadron of steam launches armed with infernal machines on spars. The Rebels lacked the requisite mechanical skill to work their machines and the first few attacks were foiled by secessionist incompetence. However, they figured it out a bit by trial and error and the USS Naumkeag was lost due to a successful explosion beneath her waterline. The USS Tyler, was also struck, but suffered only the loss of her port paddle wheel and no loss of floatation.

Gunfire at night against the tiny, fast-moving craft was disappointing. However, one torpedo boat was hoist with its own petard while attacking Tyler, leaving just two. Also, having expended all but one of their infernal machines, the rebels were less likely to accomplish further success by these means.

Day 3: Pressing on

Despite the losses of the night, the Union flotilla was ever more eager to continue upriver. The Tyler's damaged paddle wheel (unrepairable on campaign) rendered it unable to keep up with the other ships. A brief captain's meeting determined that rather than abandon Tyler and her powerful broadsides of VIII-inch Columbiads, we would tow her using one of the transports.

Just above Hannahsville, the Union flotilla encountered Battery Mickel, which was taken with minimal damage to the ships.

Further on, the flotilla reached Dave's Mill, which we quickly burned down, which was unfortunate in that we later learned that we might have used the millwheel to repair Tyler. Still, it made a good fire and taught the deluded rebels the price of treason.

Rumors came to the Union flotilla that completion of the rebel ironclad upriver had been further delayed due to mechanical incompetence complications.

Day 4: Smyth's Ferry

The Union flotilla fought batteries at Smyth's Ferry. The batteries repulsed our initial attack, but fire from Tuscumbia's XI-inch Dahlgren's quickly silenced the battery and drove off its crews.

The flotilla also captured a steam ferry and pressed it into service. As we proceeded upriver, the new ferry provided tow service to the still-disabled Tyler.

Day 5: Setback at Battery Murphy

The Union flotilla proceeded upriver passing Kettler's Ferry until we came upon Battery Murphy. In the action against these guns, the flotilla prevailed. However, a shot from the batteries disabled Essex' engines leaving her without motive power.

A consultation of ship captains determined that repair of Essex was essential. There were reports of rebel ships nearby upriver and it was decided to width raw to Kettler's Ferry to make repairs to Essex and continue next day.

During the night, an attack by secessionist cavalry was decicively repulsed, thus gaining more renown for the expedition.

Day 6: End of the rebel monster

The damaged to Essex' engines being repaired, the flotilla set out to run down the rebel ships upriver and bring them to a decisive battle. The enemy withdrew  from our advance through the day. Even after joining with the ironclad, which had finally come down river, the rebels kept moving upstream until we thought they would mire themselves in the swamp at the head of navigation.

However, this withdrawal was merely a ploy to allow them to strike the Union flotilla at night when our superior gunfire would be minimized. What ensued was a fateful and sanguinary affair that ended the rebel threat.

The Union squadron deployed with the Rattler out front as a picket. Further down the river were the Monarch, Essex, Tuscumbia, and Tyler (initially towed by the captured ferry).

The Confederate squadron came on with CSS Missouri in the center. Persistent mechanical failures had reduced Missouri's speed to an almost negligible rate. Rather than let her be destroyed on the stocks without a fight, the rebels towed her downstream into battle. This masked her forward battery, so she need to turn broadside to the Union ships in order to fire.

Accompanying Missouri on her port side were the CSS General Bragg and CSS General Beauregard. Also, the lone armed, surviving torpedo boat was at the extreme left of the line.

As Missouri advanced and turned broadside to the Union ships, Lt. Cmdr Smyth in Monarch saw his change for a ram. Getting steam up as aggressively as possible, he braved Missouri's fire and pressed in.

The rebel rams came downriver quickly aiming to smash into a Union ironclad or two. However, the Union ships were diligent not to present a target for the rams. As things transpired, the tin clad Rattler (to which Lt. Cmdr Kettler had transferred command after the sinking of Naumkeag) was struck by the Beauregard and sunk. Splashing throughout the water, Kettler was able to make it to the ferry (now cut lose from towing Tyler) only to be struck by Bragg and lost. Lt. Cmdr Kettler has the brave distinction of commanding every Union ship lost in the campaign.

Essex, a slow ship—especially against a current—made its way bows-on to the rebel ships. Beauregard passed provocatively close by without getting shot (a rules anomaly), but Missouri hove into range soon enough and I got a few ineffective shots off.

Soon Commodore Arthur and his one remaining toped boat came towards Essex. I turned bows-on to him but didn't have enough movement left to run him down. The torpedo boat obliged me by smacking itself into my bow and getting crushed.


The Bragg and the Beauregard continued into the Union main line, but found little else to ram besides the Rattler and ferry. By now, too, the Union ships had found the range. In one explosive turn, Essex found itself in a target-rich position and got shots off with all its guns at once. Coupled with the fire of the Tyler, the hits were starting to count and Cmdr Creager took his ships upriver.


Finally, a lucky win of the initiative roll, let Lt. Cmdr Smyth ram Monarch into Missouri. With a resounding crash, Monarch stove in the side of the rebel monster. In doing so, however, Monarch found itself fouled with Missouri and was threatened with the prospect of being dragged under. A timely roll (generously modified by the GM) enable Monarch to escape a watery grave and Missouri settled to the bottom alone.

Cmdr Creager continued upriver with his damaged rams to eventually perform the Confederate naval tradition of scuttling them and the campaign was won by the Union.

Thoughts on Sail & Steam Navies

The rules we used for the game is our latest enthusiasm, Sail & Steam Navies by Bay Area Yards. There is a lot to like about these rules. They are streamlined for easy play without genericizing too much. The main thing we notice are that the rules heavily favor ram attacks and minimize the effect of gunfire.

The reason for this is twofold:

1) The game sequence of Shoot - Move - Move makes it difficult to target ships coming at you. A ramming ship can be out of range or out of arc in the shooting phase, and then make two moves to make a ram attack without ever being shot at, even if most or all of their move is within range and arc of enemy guns.

2) The effect of shot is not terribly destructive. Once you actually hit, you roll a number of D10s equal to the difference between the gun rating (GR) and the armor value of the section hit. Each D10 has only a 20% chance of causing actual damage (armor or hull hits) and a 10% chance of causing suppression, which is easily removed in the repair phase. Triples can cause critical hits or damage guns, but only of the section hit allows that. I've had several occasions to roll a lot of D10s and get triples for a hit on a ships smokestack that did nothing because there is no critical hit for a stack and no guns in the location.

What's needed are some house rules to address the issue. What will work would be changing the sequence to allow shooting at any time before or between moves or allowing only a single move per turn. Another change is to increase the effect of hits so that there is a greater chance of doing damage. As written, the rules give a suppression on a roll of 8, an armor hit on a 9, and a hull hit on a 10. Changing this to suppression on a 6, armor hit on a 7 or 8, and a hull hit on a 9 or 10 may work. (Or possibly suppression on 6 and 7, armor on 8 and 9, and hull on 10 because armor hits on section that have no armor or have lost all armor become hull hits.)

Theoretically, the bigger the gun (higher GR) means that you'll roll more D10s and therefore have an increased chance of inflicting damage. I'm no statistician, but I think that it's a lot like playing the lottery: the number of tickets you buy doesn't really increase your chance of winning. Rolling multiple D10s doesn't change the fact that each die has a 70% chance of doing nothing and I've rolled a fistful of dice too many times with no effect to be mollified by theoretical mathematics.

Other than that, the rules are a lot of fun to play.

Wednesday, December 29, 2010

Turkish un-delight (DANG IX)


Monday was the ninth running of Dave's Annual Naval Game (DANG). This is a tradition among a group of friends. Dave Schueler, former submariner and fellow technical writer, hosts a naval game that gets about 6 to 8 of us together for a day-long operational/tactical naval affair. Dave provided a compendium of DANGs past on his blog Naval Gazing.

For all but DANG I, Dave has provided a small set of possible themes that we can vote on to determine the year's game. This year's voting inclined towards the Battle of Lepanto where Turkish naval forces under Ali Pasha got shellacked by the Holy League lead by Don John of Austria. To put your suspense at ease: no, history was not stood on its head in our game.

The ships were Figurehead/Hallmark 1:2400 scale galleys. Dave bought these in October and painted both fleets in record time. The ships come with their own bases, but Dave put these on 20mm x 40mm Litko 3mm thick wooden bases for better movement and getting the ships to line up in formations better.

The Christian fleet, galleasses in front
After a brief intro by Dave, we chose sides. The Turks were Kevin Smyth, Dave Creager, Paul Hannah, and me. The Holy League was Dale Mickel, George Kettler, Scott Murphy, and Mark Waddington. The game started with each side choosing its admirals. We had a list of historical characters with a small bit of information about each choice. After choosing, we were given more information about each admiral, such as how they may react in a battle. The final characteristic of the admirals would not be known until they actually got into a battle, when we would roll to see if they are superior, average, or poor. More on that below.

The first part of the game was an operational phase where each side jockeyed about attempting to raid enemy ports, consolidating our fleets, and seeking out the enemy. The Holy League managed one successful raid on the Turkish-held Dalmatian coast. Our attempted raid on Crete was a disaster resulting in a great loss of fighting crews. We had to slink back to a friendly port to get more soldiers for the fleet.

The fleets consolidating for the big clash
Paul seemed very interested in a raid on Venice, which looked much too formidable—especially after our Crete disaster. We feinted that way with a dummy fleet, but the Holy Leaguers didn't bite. As it was, the operational phase ended when our fully consolidated fleets met off the coast of southern Greece.

Now we rolled to see what our admirals' qualities would be. Of our for admirals, three were sucky and one was merely adequate. This would affect how well we handled our fleets. (The Christians, I believe, rolled better.)

The rules we used for the naval action were Christian Fire and Turkish Fury by David Manley. The rules are an adaptation of the popular American Civil War rules Fire and Fury. Manley's take on the galley-style naval actions is that galley fleets behave more like formations in a land battle than individual ships. He did an earlier set of rules for ancient naval gaming called Greek Fire and Roman Fury, which put shape to his ideas. Christian Fire and Turkish Fury extends that concept to the gunpowder era. It's unclear how to get copies of the rules. They were published in a magazine some time ago. Dave has copies he got from David Manley.

Dave set up the playing area according to his predetermined idea of how coastal islands would feature for any given area on the operational map. The island placement restricted us to a narrow front. The Turkish ships are faster, so we might have attempted a flanking run if we had open water. However, we had to adapt our thinking to what was pretty much a head-on fight.

One restriction to our battle plan was Paul's admiral. Sucky though he was, Hassan, the son of the great Turkish admiral Barbarossa, was a fire eater. The wing he commanded must move at full speed towards the nearest Christian squadron. We lined up with my two Turkish squadrons in line abreast in the center. Paul was on our left in line astern, with the plan to skirt the island there and then form up against the Christian right. Kevin's Barbary squadron, our only elite formation, was behind me as a reserve, and Dave Creager's squadrons were on our right.

The Turks arrayed
We thought, well hoped, that we would have an advantage in numbers to offset the Christian advantage in technology. But that didn't seem to be so. Also, many of our "numbers" were smaller ships with paltry combat value. Against us were several elite Christian squadrons and their galleasses. In the Mediterranean of 1571, the galleass was the dreadnought of its day. With a much broader beam, it could mount a heavier battery, including broadsides, that provided all-around fire rather than being limited to straight-ahead fire as other galleys were. The Leaguers concentrated their three galleasses in the center between two galley squadrons.

The Christian center
We set up far enough apart that it took a few turns of movement before we came in gun range of each other. Paul (a.k.a. Hassan) ran up at full speed, while the rest of the Turks came on at half speed so as to be near enough to support Paul, without being the first into the narrows between the island groups.

The action started, as expected, with Paul's squadrons meeting the Christian right wing. Paul's two leading squadrons were wee galiots with poor long-range fire. The initial long-range volleys had little effect. But in the ensuing close range fire and melee, Paul's galiots fared for the worse worse. In the first couple turns of the game, our left wing was in severe trouble.

Christian fire! Dale shoots Paul's lead squadrons
In the center, I came on with my two large Turkish squadrons right into the teeth of Scott's galleasses. The result was predictable. Both squadrons got shot to bits. My lefthand squadron managed to get into melee contact with its tormentor, but that didn't change things. The Venetian galleys I fought had the upper hand throughout and my squadron was flotsam in just a few rounds. My other squadron held out long enough to inflict a bit of gunfire damage on Scott's ships. I even managed to put a galleass into disorder a couple times, although there was no chance of sinking one.

The fleets closing in after Paul and Dale's first clash
My squadrons engage - poorly
Kevin brought up his elite Barbary squadron and its supporting squadron of fustas. In just a few rounds, Kevin managed to shoot up Scott's lefthand squadron and then close in to destroy it. In the follow-up to that he also managed to contact a galleass that had been disordered by my feeble gunfire (my only tangible contribution to the game) and destroy it.

Kevin's Barbary squadron makes its presence felt
while only two ships remain of my two squadrons
On our right (the Christian left), Dave Creager and George slugged it out in the shadow of the hampering islets. The result was much like the legendary Kilkenny cats. Dave C. came out on top, but with only the bare minimum of ships in one squadron and only his wing flagship surviving out of the other locked in mortal combat with George's flagship, which was George's only survivor.

Turkish Barbary fury! Kevin's squadrons break through
supported on the right by the remnants of Dave C.'s squadrons
The situation by now was Dale victorious over Paul, with little damage to himself. Scott was somewhat diminished in the center, but with two of three galleasses remaining. George vanquished on the Christian left. My two squadrons were as gone as Paul's. Dave C. had just a few ships. Kevin was victorious and undamaged in our center. However, Dale's squadrons were turning in and Kevin had yet to bear the fire of Scott's galleasses. We called it a Christian win.

The day was another DANG success. Much thanks to Dave and his wife Lynn for their hospitality. In addition to a great game, they provide a spread of delicious food. One treat this year were Lynn's rum balls. I haven't had a run ball since the 1970s. My friend Chet's mother used to make rum balls and brandy balls every Christmas and I couldn't get my fill of them. I don't think I ever got drunk on them, but I did retain a fondness for rum well into my 20s.

The day ended with us admiring George's latest model aircraft creations. He's been making masters for 1/285th scale planes for about ten years. He had Phantoms, MiG 21s, MiG 17s, F-105s, and others that were being readied to be sent for casting. It brought to ind how long it's been since we played an air game. We also, discussed options for next year's DANG, although it will be October before we get down to voting on choices.

Monday, December 28, 2009

Los! (D.A.N.G. VIII)


Today was the 8th occurence of Dave's Annual Naval Game (D.A.N.G.) run by Dave Schueler as part of our Christmas vacation activities. I haven't been to all, but all that I've attended have been a great time.

This year's even was "Action off Tunisia" and was a small combatants campaign set in 1943 during the Axis' last gasp in North Africa. I played the Axis side along with Kevin Smyth and Arthur Brooking. The Allies were represented by Dale Mikel, Scott Murphy, and Dave Creager.

The area covered by the campaign stretched from Bone in Algeria to Valetta in Malta, though most of the action took place in the area around Tunis to Porto Empedocle in Sicily. (Bone, btw, is now called Annaba and in its earliest incarnation as Hippo Regius, it was the home of St. Augustine.)

The tasks each side had to perform were routine patrols, minesweeping, minelaying, and convoy. In addition, the Allies had to keep German convoys from getting into Tunis. Each day of the seven days covered by the campaign was divided into AM, PM, and Night turns. We plotted our missions and Dave determined if any of our forces collided. The day provided three actions.

Action 1: Fighting off Porto Empedocle, Sicily

We (the Axis) sent our missions out at the start of the game with the hope of running into something worth fighting. Our major forces were at Porto Empedocle (a.k.a. Port Imbecile) on the south coast of Sicily. We sent our five schnellboote (a.k.a. S-Boats or, to the British, E-boats) swanning about hoping, unsuccessfully, to catch a convoy while we swept outside our port for mines using our remaining two craft, a pair of under-armed Raumboote (R-boats, also E-boats to the Brits). As the R-boats swept away, they ran into a pair of British destroyers bristling with guns of every calibre.

Having no torpedoes and armed only with a single, rear-firing 20mm autocannon and two forward-firing light machine-guns, we were for it as soon as contact was made. Our only hope was to run like hell and seek safety under the shore batteries of Porto Empedocle. As luck would have it, the British were able to pound one of our boats (mine) with 4" naval guns—no mean feat given the odds against their hitting small fast craft with big guns. However, Jolly Jack Tar forgot Nelson's maxim that "no sailor but a fool fights a fortress" and pursued us right into range of the 88mm batteries that protected the harbor. As shell after shell found its mark on one of the British destroyers, they made about and headed out of range with one ship at full steam and the other limping from significant damage. Our loss was a single R-boat. We figured it was not a bad exchange as we hoped the damaged DD would be out of action for the rest of the campaign, or at least most of it.

Action 2: Tangling with Fairmiles off Tunis

The next action was fought at night on Day 2 in the waters outside Tunis, but too far away this time for us to expect help from shore fire. We sent the two S-boats we had in Tunis off to patrol in the area of Bizerte, but instead ran into a force of three British Fairmile C motor gun boats and three Fairmile D motor torpedo boats (a.k.a. "Dog Boats").

Although not mounting 4" guns, the Fairmiles also bristled with firepower. The Cs mounted 2-pdr. pom-poms, 6-pdrs., and a few 20mm mounts. Our ships had torpedoes, which are next to useless against small craft, and two single 20mm mounts (fore and aft) along with some light MGs. Again, we were not only outmatched in firepower ship vs. ship, but outnumbered 3:1.

The S-boats ("S" stands for schnell!) were fast, but the Fairmiles were plenty fast, too. We took a peppering from them. Kevin commanded one boat and Arthur commanded the other. Early on, Arthur's boot took a hit to his steering that forced him to continue straight for four game-turns. Unaware of this, Dave Creager "crossed the T" with one of his Fairmiles only to get rammed by Arthur's unintentional kamikaze. The resulting crash was about as bad as it gets. Arthur's boat cut Dave in two and destroyed itself in doing so.

Meanwhile, Kevin managed to get away from Scott's boats and the action ended with one S-boat damaged and one sunk on our side and a Fairmile C sunk on the Allied side (possibly minor damage to some other boats, but I don't think were were hitting anything). This was another morale victory for Der Axis. The loss of an S-boat for a Fairmile MGB was a favorable exchange for us.

Action 3: Destroyers (again)

The final action of the campaign took place on day 3 when the five S-boats we had in Porto Empedocle were en route to Tunis to operate from there, since that's where the action tended to be. In their first two missions of the game, the S-boots had come up empty in their sweeps to find enemy forces. In this mission, which was more an attempt at transit to a new base, they came into contact with the same two British DDs that ran into the shore batteries at Porto Empedocle. It seems that by herculean effort, the boys in Malta managed to get the damaged ship repaired within 24 hours and both DDs were fit and ready for another fight. They, too, were en route to operating in Tunis and moving at flank speed.

This was another "brown trousers" moment for us, but we finally had the A-Team in action, however outclassed it may have been by the DDs. These S-boats were of a later class than the ones that saw action off Tunis. Armed with torpedoes, a 40mm autocannon, a dual-mount 20mm, a single-mount 20mm, and light MGs, they had some firepower and their torpedoes had worthy targets. We also had speed with a top rate of 40 knots vs. 36 knots for the DDs.

We shot off a volley of torpedoes at the point that we sighted them and they were still unsure of our presence. Arthur fired all his "fish" at Scott's DD while I fired one boat at Dale and kept the other boat's torpedoes in reserve, as did Kevin with his one boat. We basically had only bow shots, so our chances of a hit were slim. The torpedoes had to run one turn before arming and our targets managed to side-step them.

The shooting was a little better for us than in the last encounter with the destroyers. They hit one of my boats with a 4" gun (I got away with minimal damage from it), but for the most part, they were not hitting well. We scored plenty of hits with significant, if not extensive results. The DDs having armored bits, a lot of our hits were ignored. We did manage to shoot up Dale pretty well and he was on fire, had lost some weapons, and had his bridge out of action for a few turns.

Arthur turned and retired after his torpedo volley and the Brits never sighted him. Kevin managed to turn his boat and scored most of the hits on Dale's DD. I had turned one of my boats around but the other kept straight to avoid running into my own torpedoes. It was at this point that our fortunes turned.

Still as overly-aggressive with their bigger ships as they were when they ran them up against shore batteries, Scott chased my lone boat and in so doing ran into the torpedo spread I'd fired three turns earlier. Both fish hit and the resulting damage sunk the ship. The action was over with no boats lost for the Axis and one DD sunk and another damaged (superficially) and making away.

After action

By now it was late in the afternoon and we called the campaign. So far, the Axis had managed to get one convoy through to Tunis as well as a special mission in and out of Tunis involving secret cypher machinery and what-not. (All very hush-hush.) The biggest disparity had been in ship losses. We lost one R-boat and one older S-boat while sinking a Fairmile C MGB and a destroyer. Dave called it an Axis win.

It would have been interesting to see how the rest of the campaign would have gone. We had another convoy coming in, which was well-guarded by a corvette and several MFPs. It was the only time in the game we would have had our own ships bristling with firepower. (But, then only if the Allies had contacted it.)

Tuesday, December 30, 2008

Holiday gaming

After a long time of being snowed in, I finally got out and about as of Monday. The snow is still clumped in some areas around beautiful Lynnwood, although to the south, it's much clearer. I live in what's called the "Convergence Zone." This means that whenever the weather is crappy in the Pacific Northwest, it's even crappier in the CZ.

Monday was DANG (Dave's Annual Naval Game). Not me Dave, but the other Dave, Dave Schueler. Dave has been running DANG for several years now and I've made it to most of them. It's a biggish event with about six to eight players and a lavish spread of food. Most years it's been a kind of mini naval campaign that generates several actions. This year's event was a single modern naval action set hypothetically in disputed waters between Australia and Indonesia. We used the Harpoon naval rules. I played on the Aussie side and for several turns had the only viable RANS ship in the area. Fortunately, it was an Adelaide class FFG, HMAS Newcastle. The Adelaide is was Oz calls a Perry class frigate. It has a single missile launcher that is capable of dealing a lot of misery in a short time. Only four Harpoons, but a world of SM2s and smaller AA missiles. The Harpoons are the ship-killers, but I had the most effect with the SM2s firing in an anti-ship rôle. 

In the opening phase of the game, the Aussies had to evacuate crews for three oil rigs and get the evacuation force off the board. I'm not sure what the Indonesians needed to do, but they didn't do it in any case. All the crews were evacuated, though we lost a rig tender that had been attempting to evacuate the crew of one rig. The Newcastle shot up two Indonesian gunboats and an Indonesian frigate without loss to itself. It also survived a bombing pass by a flight of Indonesian F-5s taking down one of the attacking aircraft. From there, it proceeded to carry out mission orders to destroy all oil rigs in the area (ours and theirs) and shell a shore installation. At this point, its charmed life ran out--but not before a little more charm came its way.

By attacking the northernmost Indonesian rigs with gunfire, I strayed well out of support range of the three Adelaide class frigates that made up the Australian response force. The Indonesians had their own response force of gunboats and corvettes that popped onto our radar screens just before they started launching volleys of Harpoon and Exocet missiles. I lucked out for one turn when the Indonesian missiles locked onto my escort, the gunboat HMAS Bathurst, and a nearby oil rig that I was attacking with gunfire. Both were utterly destroyed without effect on the Newcastle. Then the shrimp hit the barbie. The next Indonesian salvo was 16 missiles. I managed to decoy or shoot down several, but the several others that got through finished me off with *boom* to spare.

The only thing that spared Newcastle from overwhelming overkill was the presence of my other ship, HMAS Sydney. I sailed north at full speed and caught a salvo from the other batch of Indonesian ships. I was able to get off an opportunity shot of four Harpoons and five SM2s at the Indonesians, but their hits on me were crippling. I managed to sink a corvette and damage another ship, but my sensors were knocked out, so my missiles were out of action. Another small salvo came in and I was sure it was curtains for the Sydney. However, the lovely Phalanx defense system has its own radar and came in to decoy and shoot down every missile in the salvo. That was the last shot for the Indonesians. Out of missiles and with two unscathed Adelaide class FFGs heading toward them, the Indonesians turned around and ran for home waters. The game was declared an Aussie win, but at the cost of one frigate lost and one heavily damaged.

Today, Dave came over and we indulged ourselves with some boardgames. I love boardgames, but I get little opportunity to play. I have several new ones that I was hoping to try.

Game 1 was Texas Glory from Columbia Games. I played the Texians and Dave was Santa Anna and his minions. It's a bit overwhelming to see a juggernaut of Mexicans coming on, but the key to Texian victory is to hold on--or get really lucky and catch "The Napoleon of the West" with his pants down. I lost the Alamo (thanks for tryin' Davey), but I held on at Goliad. The Mexicans were now storming into central Tejas with their bloodlust up, burning towns and committing depredations all the way. Texas Glory uses cards to determine what you can move each turn and some of the cards represent "events" such as the ability to launch a surprise attack or send Comanches at your opponent. I had Sam Houston and a force of good troops, including the New Orleans Grays and a strong unit of riflemen, at the town of Victoria and I had the "Deguello" card to play. The card let me fight to the finish. (Normally, a combat is ended after three rounds, the attacker having to retire if any defenders are left.) My hope was to strike out and eliminate one group of Mexicans. As luck would have it, his nibs the generalissimo/el presidente was there in person. After four rounds of combat, the Mexican force was eliminated and Santa Anna lost, an instant win for the Texians.

Games 2 and 3 were Conflict of Heroes by Academy Games. This is a sort of Eurogame meets Squad Leader. The system is very interesting. It lacks the detail--the excruciating detail--of Advanced Squad Leader, but the play is challenging and focuses a lot more on how you use command resources. You start each turn with a set number of command points and for each unit you activate you get seven unit action points. You use any combination of action points and/or command points to do things with units like fire, move, and rally. That's the simple description. Dave and I both liked the game, so I hope to have more opportunities to play. We played the first two scenarios. I played Russians in scenario one and lost, Dave played Russians in scenario two and lost. I'm not sure if that's a theme that's developing.

Game 4 was Command & Colors: Ancients by GMT Games. We played the Gaugamela scenario from expansion 1 and I was the Macedonians (Alexander) by random choice. I was a little worried about the horde of Persians facing me. However, they were mostly light troops and I had Al and his Companion cavalry on my side. Dave played aggressively and ran his heavier troops out in front of his light troops. This gave me a big advantage in ranged fire with my light troops. He succeeded in eliminating one of my units, but I had a lot of good rolls and was able to do a lot of damage. I think he may have eliminated another unit, so the game ended 7-2 in my favor. We played a few games of Command & Colors earlier and I've come to like the system a lot. It's simple and has enough flavor to be interesting as often as you play it. I have all the expansions now, so I've got around 80 scenarios to play.

This coming Saturday is Drumbeat III. This is a newish event hosted by a long-term NHMGS member (and many-times president) Dick Larsen. It's a one-day miniature gaming event in Seattle. As the "III" might suggest, it's the third year Dick has hosted this. I'll be running a Field of Glory game and, I hope, playing in a General Quarters III naval game in the Morning. So, I still have more holiday gaming ahead.