Monday, May 20, 2013

Bolt Action: Gung Ho in the PTO!


We played our second Bolt Action game set in the Pacific on Saturday at The Panzer Depot in Kirkland, WA. By now our forces have grown a bit more. The Americans were all Marines now and the Japanese had a bolstered anti-tank force.

Mike Lombardi, Lewis Dorrington (a new player from the UK), and I played the Marine foot-sloggers. Phil "Blood 'n' Guts" Bardsley ran the Marine tanks. The Japanese were Dick Larsen and Jerry Tyer.

The scenario was a bunker-busting mission. The Japanese had two reinforced platoons plus four bunkers. I wasn't sure how much the bunkers would be a force multiplier for the Japanese. In the end, they were less trouble to take out, although it took the Marines until the very last turn to do it. The Marines had eight squads plus supports (bazookas, flamethrowers, a mortar, and a 75mm pack howitzer). They also had two tanks: an M4A3 Sherman and an M3A3 Stuart.

A nasty bit of concrete awaiting the Marines
Knee mortar in support of another MG bunker
The victory conditions for the Marines was to take the four bunkers by the end of the game (6 turns). We had a lot of units on the table; the full bag o' order cubes (a Crown Royal felt bag) could have knocked a bull unconscious if swung with moderate force. Nevertheless, the turns went pretty quickly with six players, each using a separate color order cube for their units.

Turn 1 was a lot of moving into place for the Marines with the Japanese shooting at everything that moved. Phil and Lewis had the Marine right flank.

An M3A3 goes into action supported by Marine infantry
Mike was on the Marine left.

Mike's Marines providing fire support
 I had the center.

Marines moving into the woods
Phil's Sherman on the line between the Marine center and right
Ready to advance with a Sherman in support
The Marine advance took it's hardest hit when Dick's wee 37mm AT gun got a shot on the Sherman's side armor and knocked it out.

Just a pea shooter...
...but effective nevertheless!
In a lucky mid-game move, I advanced my flamethrower team into position at the end of the turn hoping that I would get the first order cube in the draw. I did and whooshed Jerry's Japanese squad in the woods.

WHOOSH!
The Japanese took four casualties and two pins, but then they failed their moral test and were removed. However, the flamethrower team failed its roll to see if it retained enough fuel and had to be removed as well. Nevertheless, an advance route with decent defilade was now open.

Advancing into the recently cooked woods
On the Marine's right flank, Lewis and Phil were making steady progress.
The Stuart crosses the bridge
Jerry moved a squad forward to counter them and a firefight ensued.
Japanese in position to counter the Marines' advance
Up until this point, Phil had been using his Stuart's main gun to attempt to knock out the Japanese bunker or the other Type 1 AT gun that was shooting at him. At some point it dawned on him that 1) shooting at the bunker was a waste of a Fire order, and 2) the three MGs on his tank were a much more formidable weapon against infantry and guns. Throwing 12 dice to hit was so much better than throwing 1 to hit and then having a possible maximum of 2 casualties from the HE effect of the 37mm. Jerry's squad soon disappeared in a .30 caliber hailstorm.

After finding it to be in a useless position, I moved my 75mm pack howitzer to a position in the woods.
Ready to move through the trees to a support position 
It took a few vital turns to accomplish, but it turned out to be ineffective at shooting. It did, however, serve as a magnet for Japanese fire. Mortar, sniper, and small arms fire rained down on the gun with very minor effect. The gun took one casualty and a few pins (which it succeeded in rolling off pretty consistently) and stayed in the fight.

Although it looked dicey for the Marines in the first few turned, things seemed suddenly to turn. Their fire slackened markedly—not in volume at first, but rather in effect. My pack howitzer wasn't the only Marine unit with a charmed life. Shot after shot either failed to hit or did nothing apart from pinning. The only Marine units lost were one of my squads that imprudently advanced too far and failed a critical morale check and the aforementioned Sherman taken out by Dead-Eye Dick from across the table.

Once the Japanese started taking serious losses, the Marines had nothing to stop them and we quickly took the bunkers on turns 5 and 6.

Lewis took the first bunker with an assault from the rear.

Taking the first bunker
Later in the turn, Mike got his flamethrower team into position and whooshed the occupants.

WHOOSH! (redux)
The big bunker in the center was lost when the MG unit inside failed a morale check. The game came to an end on turn 6 when one of my squads managed to run up and successfully assault the last Japanese bunker from the rear.

Taking the last bunker 
Post mortem
As I mentioned above, despite about 50 units on the board, the turns went quickly and we finished six turns in about 3 hours of play. Bolt Action is an easy game and as the number of units decrease through losses, the pace picks up significantly.

I made all the units regular, the Japanese still seem to be much outgunned by the Marines. I didn't base the scenario on points, but I had more expectation that the bunkers would be a tougher nut to crack. Instead, after the Marines shot away the supporting units, they were free to pretty much walk in and take the bunkers with little effort.

There were no banzai charges, which might have had a good effect. There were a few occasions where the Japanese infantry had racked up a lot of pins, but could have taken advantage of the banzai rule to charge into combat anyway (and remove all their pins if they make contact).

The hero of the game (and one of the few Japanese units to survive to game's end) was Dick's 37mm Type 1 AT gun that took out the Sherman with a long shot.

Mentioned in final dispatches to the Emperor
The figures used in the game were painted by Bill Stewart (Japanese), Mike Lombardi (Marines), Jerry Tyer (Marines), Phil Bardsley (M3A3), and me (Japanese and Marines).

Sunday, April 21, 2013

Bolt Action Banzai!


We played our first Pacific War themed Bolt Action game on Saturday at The Panzer Depot in Kirkland, WA. Phil Bardsley and Mike Lombardy were the Marines, Bill Stewart and Mark Serafin were the Army, and Jerry Tyer, Dick Larsen, and I were the Japanese.

I've had an interest in the Pacific War most of my life. My father was a veteran of WW2 in the Pacific (Okinawa) and was always reading books on it. It came naturally. My first Pacific War project was a 15mm Tarawa game with Kevin Smyth using the much under-appreciated Crossfire WW2 rules, which I've just realized I reviewed many years ago...

Marines dismount from their LVT-1 and attack
I later sold off all my figures, models, and the terrain pieces I did. However, I got into 28mm Japanese some years back when The Assault Group released their excellent 28mm range. These sat for a long time getting no love from me until Warlord Games released Bolt Action last year. I finally got around to painting what I had in October and purchased several more packs that were on hand at The Panzer Depot. I also completed two Type 95 Ha-Go light tanks that I bought from Company B  at our local Enfilade! convention several years ago.

We've played several games of Bolt Action so far, all set in the Western Desert. Bill Stewart and I have been painting Japanese for a while. After our last game we decided that we were near enough to critical mass to plan a game. Much feverish painting later, we had two platoons plus a number of supporting weapons teams (MMGs, "knee mortars," snipers, even a flamethrower team).

Mike Painted one of the box sets of US Marines from Warlord Games and I managed to paint two Marine squads plus a couple flamethrower teams from an order I got in from The Assault Group recently. (I had earlier painted two 81mm mortar teams and two bazooka teams.) I also had a Warlord Games M4A3 completed, which completely outclassed the Japanese tanks. The Marines were augmented by Bill's vast supply of G.I.s he's had painted for some years now.

We played the Top Secret scenario from the Bolt Action rule book. The objective was a ladder—for lack of anything else at hand—placed in the center of the table in fairly clear terrain. (Perhaps it was the only means of getting to the delicious coconuts in the trees and therefore vital to each side's war effort.)

We wound up having a large number of "units" on the board. Not so much in infantry squads (only six total), but in all the weapons teams. On retrospect, that was a bit much and the Crown Royal felt bag used for our order cube pull was pretty full.

I had one Japanese squad, the two Ha-Gos, a sniper team, a "knee mortar," a three-man command group, and a MMG. I advanced my squad through the jungle to take position on the edge facing Phil's Marines.

My initial advance
Meanwhile, Phil advanced one of his squads into a patch of jungle but got stung immediately by my sniper, who took out one of his B.A.R. gunners. In response, Phil pushed his squad out into the clear to go after the sniper.

Phil's Marines advance
The Marines managed to kill off the number 2 guy in the sniper team, but the triggerman remained undaunted and took out the Marine squad leader. Next turn, I brought on one of the Ha-Gos that were in reserve, which sent Phil back into the trees. He brought up a mortar and one of the bazooka teams to have at the sniper and the tank. The tank survived two missed bazooka shots, but the sniper went up in a puff of smoke.

Phil's other bazooka team hiding in the grass shack
 Meanwhile, Mike brought on his M4 and started taking shots at my squad on the jungle edge. Even though I had the suicide tank bomber figures painted, we have no rules for how to use them. One of them just served as eye candy.

If only...
 On the other edge of the table, Dick advanced his first squad only to see it evaporate in the teeth of the Army's withering fire. Bill's "doggies" took up a commanding position in a patch of jungle at the top of a hill.

The Army takes position
Jerry ran his troops up to to the woods edge.

Advance for the Emperor!
Next turn, he sent in a squad to close assault and took the position.

Banzai!
However, an immediate counterattack by another Army squad, re-took the position. Jerry's other squad was left high and dry in the open.

Exposed in the open
My one infantry squad was in position, but beset by Mike's M4 and a mortar that had zeroed in.

In position
Of course this left me no alternative but to attack. I rushed out of cover into the open to assault Mike's Marine squad only to get decimated my superior firepower. Undaunted, I passed the critical morale check and next turn I slammed into the Marines with all two of my remaining men.

Banzai! redux
As expected, it didn't go well. I later attempted a similar forlorn hope banzai! with my command team, who never made it in contact. This left me with my tanks, MMG, and knee mortar.

Sole survivors
Mike moved his M4 over the ridge to challenge my Ha-Go that had been tormenting Phil along the flank. His first shot hit and miraculously bounced. Next turn, I hoped to get the order cube first and attempt to knock out the M4. However, Mike's cube came up first and his second shot didn't disappoint.

The predictable end when a Ha-Go tries to punch above its weight
My left flank was completely open and I had only my other Ha-Go, the MMG, and the knee mortar left. The little knee mortar zeroed in on Mike's Marines still hunkered behind the bridge. With the M4 on the other side of the ridge and jungle patch, I bravely advanced my remaining tank to take Mike's Marines under fire as well. This got him moving and soon, the Marines were swarming my remaining troops.

Closing in
The knee mortar team gave it up for the Emperor when one of Phil's squads got it in close assault. He was going to flame it, but he couldn't get the FT team into position.

On the other end of the table (where I apparently took fewer pictures), Jerry had lost his two infantry squads and was holding on with his support weapons—including a sniper who couldn't hit the broad side of a barn. Dick had two squads mostly intact, but was beset by Bill and Mark's Army troops.

In the denouement of the game, Phil's mortar zeroed in on my Ha-Go on the first shot. The penetration roll was a "6" and the damage result roll was a "5". My Ha-Go went up in flames like my other one.

Result of a very lucky shot

 Post Mortem

I made the Americans veterans and kept the Japanese as regulars for the game. I thought that the fanatic and banzai rules for the Japanese would make them tougher. It just made the Marines 33% harder to kill.

There were a lot of support weapons on hand. Because we had seven players and six (I think) infantry squads, I thought a larger number of them would give people more units to run. It also gave the edge to the Americans who had a lot more firepower in their medium mortars. I'm not sure what Bill pulled out of his boxes for the Army. I kept wondering how five Japanese squads plus supports could run into trouble against three squads of "doggies." I think it may have been more even than that.

I managed to get NO pictures of Bill's excellent Japanese troops. I'll have to remedy that in our next game.

I have a handful more of Japanese figures to paint and I just got the last pack of two Assault Group Type 99 MMGs in John's shop.

I also have my remaining Marines to finish. This is the army I will use in the Bolt Action tournament coming up at the Enfilade! convention in May.

I placed a small order to Company B to get a couple of Japanese Type 1 37mm AT guns, who's Wikipedia article cites them as ineffective against M4s...

I also ordered a Marine 75mm pack howitzer and a Marine M-3 37mm AT gun—not that the Americans need any more firepower!

I've also got the wheels turning in my head about making fortifications like MG bunkers, rifle pits, gun emplacement, etc. I've found, perhaps, a new use for old CD-ROM disks.

Sunday, March 24, 2013

Bolt Action: Rats of the Desert


Saturday saw our fourth foray into WW2 skirmish gaming using Warlord Games' Bolt Action rules. Phil Bardsley, Bill Stewart, and I played an initial game of these rules back in early February using the few figures we had painted—mostly Bill's, augmented by a few units from Phil and me.

Several years back Phil and I caught the North Africa campaign bug when Artizan Designs released their WW2 range of 28mm figures. Phil started some DAK and I started some 8th Army and French Foreign Legion (the Free French who fought for the allies, not the Vichy swine). We each got about two squads done and left off for years thereafter.

When Bolt Action came on the scene, I went looking through my boxes to resurrect the units I had finished and to start painting the pile of raw lead I had amassed. That pile included more legionnaires as well as some Italians. Bill had been painting some of Artizan's commandos/S.A.S. as well as a lot of NW Europe Americans and Germans.

What might have been a one-off game has become an irregularly monthly occurance. Mike Lombardy and Dick Larsen are regulars in the games and we have guest appearances of others, like Dave Schueler.

We also had some time to paint. I finally managed to get two more squads of British 8th Army completed along with a mortar, a Vickers MMG, and two bren carriers in desert splinter pattern. I also finished one squad of Italians in their little shorts and sun helmets. Bill managed two squads of Afrika Korps and another two squads of North Africa/Med commandos and a mortar and Vickers for 8th Army. This gave us the opportunity for a game using only North Africa troops, instead of the ersatz forces we've used until now.

Saturday's game was a scenario that came out of my head. Mike and Phil played the Axis (of evil) and Bill, Dick, and I were the Allies. Phil and Mike set up with one squad each plus a MMG and medium mortar in support. The remaining troops were in reserve.

Phil had the Afrika Korps squad  on the right while Mike had Mussolini's Merry Men on the left.

"Is it time to surrender?"
The Allied attacking force was Dick with three squads on the right, Bill with two squads and a mortar and MMG in support on the right, and me with two small squads in bren carriers along with a mortar, MMG, and a command group of one lieutenant and two riflemen.

My attack started inauspiciously when Mike zeroed in on one of my bren carriers with a mortar in the first try. Fortunately, he only set it on fire and the brave crew put it right out.

An opportune moment to brew a cuppa
While Dick worked his way (mostly) along the edge of the board to catch Phil's Germans in the flank, Bill distracted them by running his Desert Rats right up the center into the teeth of their withering fire. Unfortunately, speed is not an antidote to bullets.

Avant, képis blancs!
Run, Tommy, run!
While Mike kept up a lively fire with his mortar at one of my bren carriers, the other managed to advance in defilade along a dry wadi and come out on the flank of Mike's position.

Surprise!
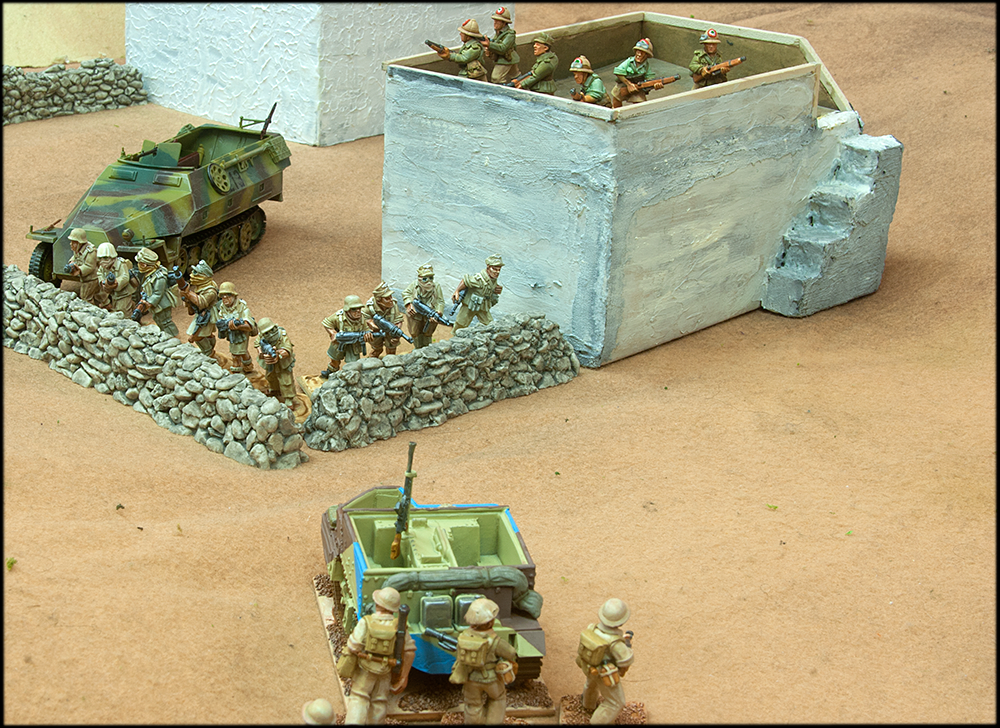
This unwelcome appearance cause Mike to fall back to the house.

Fort Apache in the Libyan desert
Bill managed to get an intact squad right up next to the barbed wire in the cover of some shell holes, that happened to be there because the Royal Artillery couldn't hit the target. However, with Phil's point-blank fire and Mike's MMG in support, the squad didn't last long.

Right in Fritz' face—for now
Meanwhile, with Mike's mortar zeroed in on its transport, the half-squad in my formerly burning bren, popped out and into a shell-hole of their own opposite the Italians.

Out of the frying pan, into the fire.
I also brought up the Vickers to occupy the hole next door and before long we were putting a lot of fire on the Axis. (And getting a bit back, too.)

While Bill's lads charge to glory in the background, my lads fire from cover
By this time Axis reinforcements were coming in. Phil's other squad manned the wire against Dick's steadily advancing troops and Mike's troops came on in a halftrack.
Phil's second squad reinforces the line
Fewer Italians, but suddenly more Germans
Dick's command was getting into position and starting to put pressure on Phil's flank.
Dick's lads advance
Mike's Italians were getting pretty well plastered by rifle, LMG, MMG, and mortar fire, which kept running up the pin level. Despite several tries to rally and one attempt to close assault, Mike was unable to move them. As in history, they just didn't have the same zeal as Germans did to die for fascism.

Not content to sit behind his stone wall and be shot at, Mike sent his recently arrived panzergrenadiere to assault my remaining bren carrier. (The other had finally been put out of action by Mike's relentless mortar.) The attack took out the bren easily; however, the troops inside had dismounted turns ago and were still a force to be reckoned with. I also had my command team nearby.

Ring around a burning bren
Coming out into the open, proved ultimately to be Mike's undoing. I got a few shots at him in the clear and he took out my command team with another assault. However, the paltry remains of my bren carrier troops (just the bren gun team and the squad leader with a tommy gun) got a devastating shot that took out four of his remaining six men. He failed the required morale test and that was that.

The Italians, too, gave it up after getting to the unrecoverable pin level 9. They never managed to recover from their initial hits and being in the building brought them into spotting range of the mortar, which had zeroed in early on and kept chipping away along with small arms fire that had little effect apart from adding pin after pin.

Finally, Dick's lads on the Allied right got around and flanked Phil's remaining squad (the other was gradually worn down until a single fire action took the rest away.

Last stand of Phil's Afrika Korps
The Allied victory condition was to capture one of the two houses and get two squads off the board by way of the road. In eight turns, we didn't do it, even though we had nearly annihilated the Axis defenders. I think the Allies started too far back; it took three turns just to get up into shooting range of the small arms. I think the Axis should have had one more squad and/or MMG—even though the Allies took a lot a damage coming in and we certainly didn't do the job in the standard six-turn time frame of Bolt Action games.

Bolt Action has been a lot of fun. Even if it isn't the most detailed set of rules for WW2 skirmish, it stands up well to other sets and has the hallmark typical of Warlord Games rules: you left wanting to play more.

So far we've focused on North Africa, but our next game will move to the other side of the globe.

Banzai!