Saturday, October 26, 2013

Red, White, & Bubinga (Dicing in Style)


I have to confess that I'm kind of a dice freak. I don't know how many dice I actually have, but I know it's a lot. I have some of every polyhedron type available: D20s, D12s, D10, D8s, D6s, D4s. I may even have a D100 somewhere. I've got them in all colors and sizes, too, from wee little 5mm dice to bigger dice the size of your fist. (The value of either escapes me just now.)

Because they're relatively cheap, I tend to buy a set of dice for almost every game I play—or just because I find a set that looks cool and I want it. I often try to match dice to the era or armies I'm gaming with. For example, I have green speckled dice (like camouflage) to use for playing Bolt Action with my Marines. I have Red dice to use for Soviets, etc. I also have my beloved "ancient dice" that hate Romans.


I can't say that using a custom set of dice really helps (I tend to roll deplorably regardless of the dice I use), but it lends to the feel of the game.

Custom dice

I have two Wars of the Roses board games that use D6 for combat resolution, Richard III: The Wars of the Roses by Columbia Games and Sun of York by GMT Games. While browsing the photos for these games on BoardGameGeek, I noticed a set of custom D6 that had Roses in place of the 1's. They looked very cool. As I browsed through the comments I saw that the person who had the custom dice made provided a GIF file for the rose pattern and the color patterns of the dice. For $1.00 per die, I had Chessex make a matching custom set for me: 12 dice in Lancastrian red and 12 in Yorkist white.

Yahtzee!
Getting custom Yorkist and Lancastrian dice has me thinking about some other custom sets. I can see getting a speckled green set with the USMC globe and anchor for my Marines in Bolt Action and red dice with an Imperial chrysanthemum for the Japanese.

Dice trays

I've supported a couple of Kickstarter projects, so I'm on the mailing list and I get notices of other projects starting up. One of the recent projects was from Wyrmwood Gaming, who are coming out with a new product called a dice vault. It's a very nice box made of exotic wood that you can store a dice set in. I passed on the dice vault, but I visited the Wyrmwood Gaming site and found that they make some very nice dice trays.

I've been a dice tray guy for several years since I found a couple of octagonal trays at the now-defunct Phoenix Games in Redmond, WA. It's nice to have a clear flat place to throw dice where you don't need to worry about getting a cocked die or having a die roll off the table to who knows where. The dice trays I have are very nice, but I was smitten with the Wyrmwood Gaming trays as soon as I saw them online.

They come in two levels, the Affinity and the Lotus. The Affinity are made of common hardwoods like Oak, Cherry, Fir, and Walnut. The Lotus are made with more exotic woods. The rolling surface comes in leather or suede. I immediately ordered a tray made from bubinga wood (straight from equatorial Africa) with a black suede rolling surface.

Harmonizing well with my cherry table
The Wyrmwood trays are rectangular and come with a separate section to hold dice that aren't being rolled, so they don't clutter the table top.

Spacious storage room
Each Wyrmwood tray is handmade on order, so it takes a few weeks to get it. I ordered mine on October 5 and it arrived on the 24th. My only buyer's remorse on opening the package was that I didn't order two. They're that nice.

The price was good at $35.00 for the Lotus ($25.00 for the Affinity). Looking at the Wyrmwood Gaming site just now, I see that the prices have increased since I viewed them yesterday. The Lotus is now $45.00 and the Affinity $30.00. Now I'm really sorry I didn't order two.

Tuesday, October 22, 2013

Red Sabres and Land Battleships


I've been remiss with postings over the last several weeks, so I'm working backwards now to cover our last few Bolt Action games, starting with Saturday's game in this post (because it's fresh in my memory) and going back to July in subsequent posts (for which I'll just make up stuff because I have no recollection now of how the games went).

The genesis for Saturday's game was when I bought a 1:56 scale T-35 from Company B Miniatures at Enfilade! in May. It was a long time getting done, but I finally completed it in September and was eager to get it into a game. I've completed T-35s in three scales now: the C-in-C model in 1:285th, the now out-of-production Battlefront (Flames of War) model in 15mm, and now this great hulking beast.

Land battleship Potemkin
The T-35 fascinates me. The whole idea of the land battleship, of which the T-35 was the epitome, was so wrong-headed—but compelling. All those turrets firing an all-around arc of mayhem has such an irresistible appeal.

Action off the port bow!
The great tragedy of the T-35, of course, is that it never got into serious action and, despite its formidable appearance and bristling gun turrets, it was a truly crappy tank. It was much underpowered, which lead to its remarkable frequency of mechanical breakdown (a fate that befell 90% of the T-35s deployed in 1941). Also, its multiplicity of turrets made it impossible for the tank commander to direct the action of the vehicle's 11 crew because there was no internal communication system.

But this was the occasion to get it on the table as well as to give Bill Stewart's Soviets and Germans a furlough from their storage boxes.

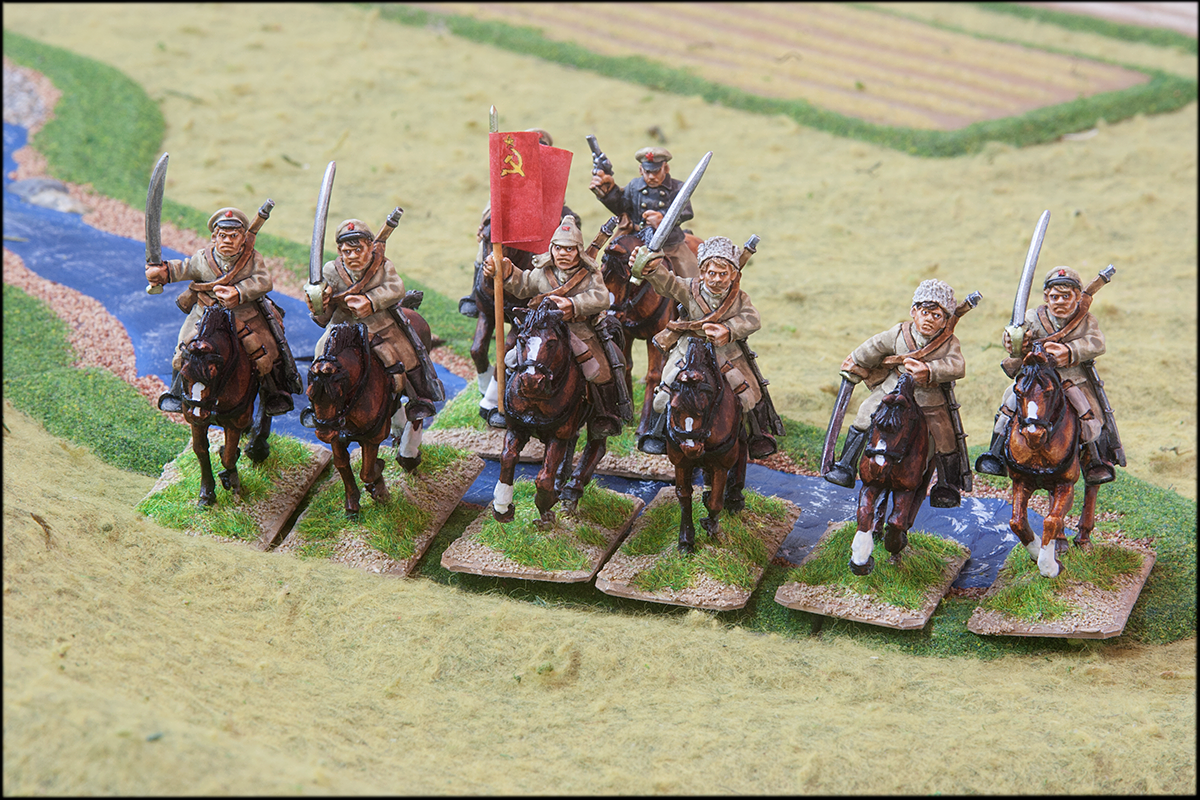
The game was a 1941 scenario with veteran German infantry holding against a Soviet counterattack lead by the T-35 and a couple squadrons of cavalry. We have no 1941 German tanks in suitable camouflage (as a later post of an earlier game will show, they all wound up in Libya), so we had to trust to the Bolt Action rules about the T-35's unreliability, namely that any pin result from fire takes an automatic +1 pin as well. This is a significant drawback because the tank can be reduced to an ineffectual state after just a few hits. However, perhaps as compensation, the Bolt Action rules make its armor a 9+, which is generous considering that the thickest armor on the tank was only 30mm.

The Russians were Jerry Tyer, Dick Larsen, and I. The Germans were Bill Stewart (who painted all the figures except the "beast") and Phil "clear cut" Bardsley.

I was in the center with my "beast" and two infantry squads. Jerry was on the right with an infantry squad, cavalry squadron, Maxim MMG, and an infantry command group. Dick was on the left with a mortar,  infantry squad, cavalry squadron, and mounted command group.

Facing us were Phil on the German right with probably two infantry squads and an MMG, but it was hard to tell because all the trees were in Phil's way. As the game progressed, there were fewer and fewer trees in Phil's position.

Phil's infantry holds the line amidst sylvan splendor 
Bill, on the left, had two squads, an MMG, and two 81mm mortars. Because the Germans had no tanks or AT weapons to counter the "beast," we allowed an integral AT rifle to each squad—which, it turned out, they didn't need...

Steadfast defenders of the pea-patch
I started out advancing a squad down to the river to cross a bridge, which I expected to draw Phil's infantry out of hiding. Once Phil broke cover to shoot my infantry, I unleashed the "beast" and gave Phil three turrets' worth of attention resulting in many hits and a few casualties.

Across the stream
The eruption of all that firepower from the T-35 got the attention of Bill's mortar battalion. The first few salvos missed, but it would only be a matter of time before they zeroed in. Phil's infantry got a hit against the "beast" with its AT rifle, which resulted in two pins using the special rule for the T-35. I was able to get it firing again and put more hurt on Phil's infantry, but time was running out for the land battleship.

On the Soviet left, Dick began his patented move-down-the-table-edge maneuver. His cavalry advanced, but then bolted back in response to a fusillade of 7.92mm bullets from Phil's MG-34.

Defending "Festung Teichschaum"
On the Soviet right. Jerry moved forward with his cavalry against Bill's advanced position "Festung Teichschaum" (fortress pond-scum). Faced with a bit of boggy ground that impeded rapid movement, Jerry withdrew his cavalry after the mausers opened up on him. At this point, both cavalry squadrons had pulled back in response to German fire, but couldn't get far enough back to escape getting hit.

Red Sabres forward!
Jerry advanced his Maxim gun to a position that took both of Bill's positions under fire, although Bill's reserve position, "Festung Erbsenfeld" (fortress pea-patch) was at long range. The Maxim took a few hits early on and was reduced to one heroic machine-gunner keeping up a desultory fire. The minuses for long range, target in cover, and reduced crew (-3 net) made it tough for Jerry to make any impression on "Festung Erbsenfeld" and Bill's Landser remained relatively untouched throughout the game.

Meanwhile, my infantry and the "beast" were whittling away at Phil's right-hand infantry squad and eventually eliminated it with the help of a few 82mm rounds from Dick's mortar.

However, Bill's mortars had finally zeroed in on the T-35 and it was soon hopelessly pinned. I was able to rally once and roll off all the pins, but I was still stationary under a barrage of mortar fire and by next turn, I could no longer do anything because I couldn't pass an order test.

Pinned and useless
Jerry moved his command group to the "beast" to provide some moral persuasion, but a commissar with a pistol has little effect on motivating a tank to return to a state of socialist ardor sufficient to perform as desired. Despite numerous fresh .38 caliber splash marks on the T-35's paint job, the "beast" would do nothing for the rest of the game and eventually withdrew when the number of pins became too great to ever roll off. Even if I had managed to carry out an action, a -4 or more penalty for pins would render any fire insignificant.

I was able to get my two infantry squads to advance. One went towards Phil's position on the hill and the other moved to flank "Festung Teichschaum." Faced with two Soviet squads closing in, Bill abandoned his position and got himself embogged in the swamp to his rear.

Attacking Phil's hill
Flank attack on "Festung Teichschaum" 
Jerry took advantage of Bill's withdrawal to move his infantry into Bill's former position, where he took out the FO for Bill's mortars, and to move his cavalry around to charge in and sabre the retreating Hun. Stormed at with shot and shell and reduced to 40% of its original numbers, there was no stopping the horsemen once they had a target in range.

Sabres in the bog
But in the next turn, "Festung Erbsenfeld" opened up and eliminated Jerry's few remaining bolshies on horsies. It's a glorious—but brief—career in the Red Cavalry.

Dick had been slowly working away at Phil's MMG with his infantry squad while Phil moved his other infantry squad to counter the advance of my infantry (and replace his eliminated squad). This gave Dick the opportunity to move his cavalry unopposed down the table edge to ultimately break through the German line.

Skulking to victory!
Dick ultimately took out Phil's MMG with an assault, which left the road open to another breakthrough (although he didn't make it off the table by game's end).

My infantry was now effectively out of action due to repeated hits that pinned me to the point of uselessness. I routinely failed order check after order check.

By turn six, Phil had one mostly intact squad left, Bill was still holding "Festung Erbsenfeld" with one squad and an MMG, with his two mortars still untouched.

Holding "Festung Erbsensfeld"
My "beast" had departed and I had two very reduced, very pinned squads. Jerry had a shot-up Maxim and a shot-up squad. There was no chance we were going to get these troops off the board past Bill's positions, but Dick's cavalry was galloping around the German rear area like J.E.B. Stuart and his infantry were close behind.

We called it a minor tactical win for Stalin's minions.

No set plans for the next game, but I will run a small Pacific War game at the upcoming NHMGS game day at the Paine Field Flying Heritage Collection in Everett, WA.


Tuesday, August 27, 2013

I'm Gonna Get Medieval...


I've kicked around the idea of Medieval wargaming for a long time, but never really saw the vision all the way through. Of course, there's no guarantee that I will do that now and I have a lot of irons in the fire already. I'm just in the mood to kick the idea around again.

There are always two main considerations when I think about gaming a period: rules and figures. For Medieval wargaming, I've spent plenty of time fiddling around with both.

Rules

A long while back, I wrote a late Medieval variant for the Pig Wars Dark Age skirmish rules. They are available in the Pig Wars LMV folder in the Files section of the Pig Warriors Yahoo! group. Browsing them recently, I recall how much I liked Pig Wars and I still like some of the ideas I had for expanding them to this era. These aren't seriously in contention, though. I think I've only played them myself a couple times using Kevin Smyth's figures. My own figures are partially done and have been so since 2005, I think.

My immediate impulse for Medieval wargaming has come after browsing through a set of rules from 1977 called Gen D'Armes written by NHMGS' own Dick Larsen along with Warren Lee (of whom I know nothing) who formed a company called Tin Heroes Productions. I found my copy about five years ago at Dragonflight. I really didn't think about them much at the time, being more interested in them because they were authored by someone I knew. Looking through them now, I like a lot of the ideas and am leaning heavily in their favor.


Another possible contender is Neil Thomas' Ancient & Medieval Wargaming. These rules are a curiosity. Most miniature gamers I know around here have never heard of them or of Neil Thomas. My friend Rick mentioned them to me once some years ago and I had to confess my own ignorance. However, the rules have something of a cult following and a Yahoo! group of their own, AMWGroup. The rules were published in 2007 and are one of a few rules books written by Thomas. They're pretty simple and use mechanics you'd likely be very familiar with from other systems; they're rather Featherstonian in style. The rules are pretty straightforward; much of the book being a lot of "blah blah blah." (I don't mean that to be insulting, I write "blah blah blah" reflexively—as you can tell from this post.) If you boil down to just the rules, especially if it's just the Medieval section, it's probably a few pages and some charts.

Now, the real kicker about Ancient & Medieval Wargaming is that it's out of print and the available used copies are selling for prices that eclipse the GDP of some small countries. That's just crazy. I got a Kindle version for $15.49 on Amazon.com, although the tables are much distorted. It's a problem with ePub books. These are simple tables, though, so reconstructing them wouldn't prove to be too difficult.

There are ever so many more sets of Medieval rules that are just out of contention because the systems are too elaborate. I want something that's quick to play, doesn't require thousands or even hundreds of figures, and makes the most of the figures used. (I just don't get the appeal of rules that require you to have big units with 20-40 figures, but would play just the same if your units were blocks of wood.)

At this point is comes down to one of two: Gen D'Armes or Ancient & Medieval Wargaming.

Units in Ancient & Medieval Wargaming always comprise four stands. The number of figures per stand varies depending on the unit type, but they are solely representative. The stand is what counts. This is true as well with Gen D'Armes, which uses two-figure stands for foot and single-figure stands for mounted. However, unit sizes in Gen D'Armes can vary from a maximum of 16 stands (32 figures) down to one stand (1-2 figures).

In both sets of rules, stands are removed after a specific number of hits are taken. In Ancient & Medieval Wargaming, the number of hits is always four. In Gen D'Armes, the number of hits varies from two (peasants) to six (extra heavy foot, i.e., dismounted knights).

Combat in Ancient & Medieval Wargaming uses a consistent mechanism of a number of D6 per base, which varies by unit type. Gen D'Armes uses multiple D6 for shooting (one per stand), but uses melee values per stand for combat that are summed for each unit, multiplied by the result of an average die, and compared to get a result.

Each has a few other bells and whistles. Gen D'Armes has exploding hand cannons—and for exciting game play, you can't beat that with stick. I also have a better feel that Gen D'Armes can fill the late Medieval/early Renaissance gap better than Ancient & Medieval Wargaming. Gen D'Armes has rules for the arquebus (i.e., non-exploding hand cannons) and would probably do well for small actions in the beginning part of the Italian Wars.

Gen D'Armes is also less formalized. As I mentioned, Ancient & Medieval Wargaming uses four stands per unit (except artillery, which is a single stand). Gen D'Armes has a points list for play balance, but there are no set army lists. You're allowed to figure those out on your own by doing things like reading.

I think it's pretty clear which direction I'm going for rules.

Figures

There is no debate here. I'll use Old Glory. I already have a stock of unpainted lead. I have some figures started. I have some figures that are actually painted. Old Glory makes a wide range of medieval types and they're cheap—especially if you're in the Old Glory Army.

Next Steps

The question now is "whither the project" or "wither the project." I have the rules. I have the figures. It's just a matter of painting and mounting, which I can do at a steady pace until I've got something to game with. I will not attempt painting museum pieces. These are Old Glory, after all.

Friday, August 16, 2013

Dragonflown


I spent the last weekend spottily attending the Dragonflight 2013 convention in Bellevue, WA. I've been a few times before, mostly to check out the miniatures scene, which is minimal. Dragonflight is primarily a boardgame and RPG convention. The latter just doesn't draw me in, but I am an aficionado of boardgames in general and of hex 'n' counter wargames in particular. So, early this year I pre-registered for Dragonflight and set myself to go and focus on the wargames opportunities.

I, Infidel


My first game (on Friday) was the Ascalon scenario from GMT's Infidel. This is the second game in GMT's Men of Iron series. I have the first game in the series, which I quite like. The game sequence uses a variable bound approach where a player activates a command and, after completing movement and combat for that command, can go on to activate another command and so on as long as they remain successful. I've resisted purchasing Infidel, but now that I've played it, I'm re-thinking that resistance. I have to admit up front that I played the Fatimids and got completely slaughtered by my opponent, Ken Cassidy. Ken played the crusaders and his knights just ate my lunch. Obviously I made mistakes, but in my own defense I have to state that Ken got five activations in a row right at the start. At several other points he got multiple consecutive activations, while I typically got only my free activation after Ken, rarely, lost an new activation attempt. Nevertheless, I thought it was a good game and the Men of Iron system plays very well and fluidly--even when you're just sitting there watching Godfrey de Bouillon mercilessly slaughter your elite Mamelukes.

Rob Bottos from Vancouver ran the Men of Iron event, which featured other players tackling the Bannockburn scenario from the original 2005 release Men of Iron. There was a possibility of playing a playtest version of the upcoming Blood & Roses. I've been a dilettante student of the Wars of the Roses since reading my father's copy of Winston Churchill's The Birth of Britain way, way back when. Instead, we played the Infidel scenario. I need to trouble Ralph Shelton, who helped run the Men of Iron event and was the producer for Infidel, for a Blood & Roses playtest opportunity. The game is scheduled for release in 2014 and I'm eager to give it a shot before then.

Men who shop

The rest of Friday was spent connecting with gamers and browsing the dealers. Since wargaming is a minority presence at Dragonflight, most of the wares brought by the vendors for sale were Eurogames, RPGs, and such. In my wanderings, however, I ran across the Greenlake Games booth and discovered IRONDIE.


These are very nice metal dice from Italy (apparently the designer does the metalwork for Armani belt buckles). There is a game system built around them, which looks worthy of exploration. I was attracted to them because of their heft. Being made of iron, a fistful of these are as heavy as a sack of nickels and they make a deeply satisfying thunk when they land in the dice box. I bought several of one type (the "smasher") in all colors. I also bought a couple of iron D10. (I used the bronze D10 in the Infidel game, not that it helped.)

Saturday, The War that Wasn't


I connected with Jeff Newell on Friday and arranged to play Lock 'n' Load Games' World at War series on Saturday. I ran across this series a few years back and it became an instant favorite. I used to play SPI's MechWar '77 back in the day (i.e., the 1970s) and this is an elegant upgrade to the Cold War hypothetical wargame. The game system is very playable and smooth.

We played two scenarios with me as the Commies both times. Jeff, being a former Army tanker, has an aversion to playing Ivan, which I was happy to indulge. Russian armor dies off like flies, but, like flies, there just seems to be a lot. It's a bit heady to set up a game with stacks of armor against a few platoons of Abrams tanks--even if by the end of turn 2 there are many fewer stacks of Russian armor and the Abrams are still there ready to knock you silly again on turn 3.

The first game was a small five-turn scenario from, I think, the World at War Compendium. It turned out to be a pretty tight game, which I might have won if I hadn't stuck my chin out by advancing my T-62s into a victory hex (one of three hamlets that the NATO player had to hold) while an Abrams had a bead on it.

Game two was scenario 1 from Eisenbach Gap, the first game in the series. I've played this before with disastrous results and I was eager to see if I could do better. I did, even though I didn't win. I was able to use my smoke and artillery to better effect and managed to take the larger of the two towns required for victory, knocking out a good bit of Team Yankee as I did. However, Jeff retained a nice kill-stack in the remaining town that I couldn't get to. The game board was littered with wrecks from both sides. Given the high death rate of the T-72, I call the result a morale victory.

I already had three of the games in the series (Eisenbach Gap, Blood and Bridges, The Untold Stories), but I was so inspired after Saturday's games that I ordered another three (Death of the 1st Panzer, Paris is Burning, World at War Compendium), two of which have already arrived in the mail (quick service!). I have a lot of counters to trim...

Gadgets and Gamers

One big advantage to attending Dragonflight was connecting with area gamers. Being a miniatures gamer, I'm not plugged into the board gaming community. There is less crossover than I would have thought.

I was able to get information about other events held in the Pacific Northwest that focus more on hex 'n' counter wargames. Rob Bottos runs Bottoscon in Vancouver, BC (Surrey, actually) in November. It's been going on for seven years and pulls in a lot of people. Jeff Newell runs Game ON! in Issaquah, WA in February. Game ON! features a lot of World at War play. I joined the Bottoscon Yahoo! group and am hoping to get connected with a regular, i.e., weekly or bi-weekly, gaming opportunity. I have a lot of games that need playing.

The hard-core gamers use large tweezers to manipulate their counter stacks. It looks pretty geeky, but when you've got stacks of counters in close proximity, it's pretty easy for fat-fingered gamers to knock everything asunder while attempting to move their pieces. The tweezers help. I haven't succumbed to lure of big tweezers yet, but Jeff Newell pulled out a gadget that got my attention. Behold the wonderous vacuum pen:


Using this wee suction device, you can easily pick up counters amidst the densest stack of cardboard heroes. I was so impressed, I whipped out my iPhone, searched the interwebs for a vacuum pen, found one on Amazon.com for $5.99 and ordered two. They arrived in the mail on Wednesday. O brave new world that has such technology in't!

I've also ordered more counter trays from Chessex and GMT. This assumes that I will follow up my new game purchases with the energy of actually trimming out hundreds of counters.

Even though I didn't spend a lot of time at Dragonflight, the experience was rewarding and I will attend next year and run an event of my own.

Sunday, June 9, 2013

Wasser oder Todt!


This Saturday, we returned to the Western Desert for a Bolt Action game roughly (very roughly) inspired by the 1943 Humphrey Bogart classic Sahara! The 8th Army defended a rather lush oasis against some very thirsty Germans—and a few thirsty Italians, too.

Two squads, supported by an MG and a 2-pounder, defend the oasis
The British numbered seven squads plus supports, which included a 2-pounder AT gun, a 25-pounder howitzer, two bren scout carriers, and a Churchill MkIII. British players were Dick Larsen, Mark Serafin, Richard Li, and me. We set up first with me manning the oasis with one British squad and one squad of hard-bitten French Foreign Legionnaires. Dick and his carriers with a commando squad was on my right.

Oasis manned and ready! 
Mark manned the few buildings and a stone wall to my immediate left, and Richard with two squads, the 25-pounder, and the Churchill supported Mark to his left-rear.

Mark's boys in the buildings 
Facing us were 12 squads of Afrika Korps panzergrenadiers, supported by MGs, mortars, a 75mm light IG, and three tanks: a Pz IVD, a PZ IIIL, and a redoubtable Italian ally in an M13/40 medium light tank. The Axis players were Phil Bardsley, Doc Marshall, Jerry Tyer, and Bill Stewart.

Thin, yet amazingly indestructible, steel
Phil with two squads, two tanks, and the IG was on the German far right. He was supported to his left by Jerry's three squads. The German center was run by Doc with three squads and Bill was on the far left with three squads and the M13/40, supported by a command company with an MG and medium mortar.

The panzergrenadiers of the German center advance towards the oasis
Phil started the ball rolling on turn 1 by an attempted a coup de main with his Pz IV.  However, his movement wasn't sufficient to overrun Mark's infantry behind the wall, so he wound up shooting with the Pz IV's MGs and started the slow whittling-down of Mark's point guard.

Bill opened up on my MG and knocked out two of the three crew. My MG would remain useless until Bill finally took out the remaining crewman a few turns later.

Panzer vor!
I managed to get a shot against the Pz IV with my 2-pounder, but it bounced off harmlessly—the first bounced shots of many throughout the game. The 2-pounder crew then took a pounding itself and lost two of its three crew. This didn't seem to have a huge effect on my ability to score a hit, but I never could penetrate the target.

Wounded 2-pounder still facing off the thirsty Germans
Phil continued his bold advance with the Pz III, but this had little effect on Mark and Richard's troops behind their stone walls.

Throwing dust
The tank threat to the British diminished a bit when Phil's attempt to pass an order test with his Pz IV resulted in a failure, sending him backwards. Failed order tests plagued it for several turns and the Pz IV would spend the rest of the game trying to get back to where it retreated from. Additionally, Richard's 25-pounder and Churchill kept Phil's tanks at bay for most of the game.

High-water mark for the Pz IV
Jerry moved up his infantry against another part of the wall, using shell holes as cover.

Convenient use of missed artillery shots
This move put the Germans and British in fairly close range. Mark's most exposed unit was whittled down until it failed a morale check and went away.

Mark's tommies man the wall
The M13/40 was something we all marked for an early demise even before the game began. However, all attempts to put it out of action failed. My 2-pounder and mortar rained fire on it every turn. Despite several hits, it just held on—although it was immobilized by pins and never moved from its starting point.

Self-propelled coffin—or not
As Bill advanced on the oasis, Dick brought his scout carriers and commandos into action. After Bill attempted to shoot a carrier with the M13/40, only to see it scoot away using the recon rule, he lost interest in targeting them. Bill turned his attention instead to the oasis where unloading the M13's three MGs finally took out the Foreign Legion squad that had been harassing the the flank of his advancing infantry.

Dick's dune buggies go into action
Meanwhile, Doc steadily advanced in the center. The onslaught was curtailed briefly by a F.U.B.A.R. roll that sent one of his squads running away towards the deep desert. But by next turn the unit had recovered and was back in the fray. My troops defending the oasis were looking pretty thin. The MG and the Foreign Legionnaires were gone. My remaining squad had taken more than 50% losses, but was still holding on. The 2-pounder kept bouncing shots off the M13/40. My mortar, firing indirectly by means of its intrepid spotter, had wiped out Bill's command group with his MG and mortar and had zeroed in on the M13/40 (to no effect).

DAK closing in on the few remaining defenders
With Mark's foremost squad lost, Jerry moved his infantry up to the wall and turned the cover advantage against Mark and Richard's troops.

The wall changes sides
It was a short-lived advantage, however. Mark popped a unit over the wall to shoot at the exposed panzergrenadiers, ineffectually at first, but along with MG fire and Richard's troops. Jerry's infantry  receded back from their high-water mark to the shell holes whence they crawled. At some point, Richard's 25-pounder got a marginal hit on Phil's Pz III, which set it ablaze and forced its crew to bail out. That was the only tank loss for either side in the game.

Bill began shifting his infantry towards Dick's commandos and the exposed section of the oasis.

More convenient artillery-made craters for the Afrika Korps
By now the effectiveness of my mortar was starting to urk Hauptmann Stewart who started shooting everything he had at my intrepid spotter, Lt. Kevlar.

Lt. Kevlar, MC, DSO, VC (post.)
But the lieutenant would not be dismayed. Although he hit several times, Bill couldn't get a damage result and I was consistently able to pass my orders tests. As a result of a F.U.B.A.R. roll, the remnants of my lone squad still holding the oasis panicked, turned about, and expertly performed the tactical maneuver of close-order buggering off in quick-time.

Sauve qui peut!
This temporarily left Lt. Kevlar as the sole defender of the oasis, still calling down mortar fire on Hitler's minions. But a sticky end for him was looking ever more likely.

Closing in
With the fall of the oasis imminent—and the threat from Phil and Jerry diminished—Mark and Richard began moving their troops towards the center and attacking Doc's advancing infantry. Having once been on the verge of an assault, Doc's infantry was too shot up by now to accomplish anything.

Richard's tank and troops moving to reinforce the oasis
The persistent survival of the Italian armored corps inspired Dick to run his wee scout carrier against it at close range so he could try a shot to the side armor with his Boys AT rifle. Despite hitting with a few shots, Dick didn't even manage to scratch paint.

Bren scout carrier charges in to bounce its Boys AT rifle shots off the M13/40's sides
Dick's wee carriers survived the fight, despite the brief attention of the M13/40. Although not tanks, they did get to practice the RAC's fine tradition of swanning about the desert going withersoever they wished. Add some flags flapping in the wind and it's almost the perfect picture of Balaclava—with a less sticky end.

Chaaaaaaaarge!
By the end of turn 5, Lt. Kevlar was no more. Bill managed to finally shoot him to bits and he pushed a depleted infantry squad into the edge of the oasis by turn 6. However, Mark's infantry was just arriving at the oasis, my squad had un-buggered itself, and the likelihood of Bill's few troops making a gallant last stand just feet away from the cool waters was looking pretty good.

Nazis occupy the last post of heroic Lt. Kevlar, but reinforcements secure the oasis: no water for Fritz!
We called it a British win at the end of turn 6. The Germans would get their water only as P.O.W.s.

This was our first game with a significant number of tanks and the debut of Phil's little Axis armored corps. All but one tank survived the game. The 2-pounder, which I didn't think would last the first turn, survived the game. It never knocked out a single tank, but it contributed its share of pin results against Phil's Pz IV and the indestructible M13/40.

Mentioned in dispatches and awarded a posthumous VC was Lt. Kevlar, Bill's bête noire.